50 самых полезных jquery библиотек
Содержание:
- Нюансы работы с пробкой
- jQuery( html [, ownerDocument ] )Возвращает: jQuery
- Использование переменных шаблона
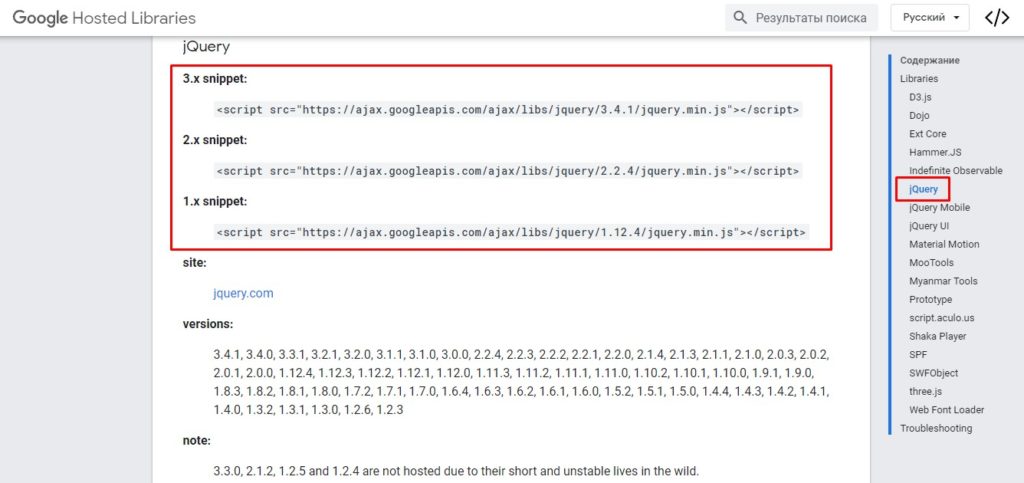
- jQuery Core — All 3.x Versions
- How to build your own jQuery
- События мыши
- 5 — $(‘#box’).addClass(‘wrap’);
- Assignment
- Плюс: простой доступ к странице
- jq Functions
- Let’s use it for real now
- Определение и применение
- Плюс: плагины на любой случай
- Перебор текущих элементов (.each)
- link About the Code
- Список функций
- «Джой»
Нюансы работы с пробкой
Чтобы выполнять приклеивание покрытия из пробки, требуется внимательность и аккуратность
Для получения прочного пола важно создать нужное физическое давление. Время склеивания значения не имеет
Прижимать плитку к смазанному клеем основанию нужно 30 секунд.
Так как все виды клея быстро схватываются, уже через час можно заниматься влажной уборкой покрытия из пробки.
Высушить поверхность поможет строительный фен.
Приклеивание основания из пробки выполняется при температуре выше 17 градусов. Здание должно иметь хорошую вентиляцию, чтобы удалить неприятный запах, выделяемый клеем.
Создать покрытие из пробки может даже новичок. Нужно только изучить инструкцию, как пользоваться клеем и соблюдать технологическую последовательность.
Об особенностях процесса и рекомендации по укладке полотна из пробки на клей вы можете узнать из видео ниже.
Средняя оценка
оценок более 0
Поделиться ссылкой
jQuery( html [, ownerDocument ] )Возвращает: jQuery
Описание: Creates DOM elements on the fly from the provided string of raw HTML.
-
-
html
Тип:A string of HTML to create on the fly. Note that this parses HTML, not XML.
-
ownerDocument
Тип:A document in which the new elements will be created.
-
-
-
html
Тип:A string defining a single, standalone, HTML element (e.g. <div/> or <div></div>).
-
attributes
Тип:An object of attributes, events, and methods to call on the newly-created element.
-
Creating New Elements
If a string is passed as the parameter to , jQuery examines the string to see if it looks like HTML (i.e., it starts with ). If not, the string is interpreted as a selector expression, as explained above. But if the string appears to be an HTML snippet, jQuery attempts to create new DOM elements as described by the HTML. Then a jQuery object is created and returned that refers to these elements. You can perform any of the usual jQuery methods on this object:
| 1 |
For explicit parsing of a string to HTML, use the $.parseHTML() method.
By default, elements are created with an matching the document into which the jQuery library was loaded. Elements being injected into a different document should be created using that document, e.g., .
If the HTML is more complex than a single tag without attributes, as it is in the above example, the actual creation of the elements is handled by the browser’s mechanism. In most cases, jQuery creates a new element and sets the property of the element to the HTML snippet that was passed in. When the parameter has a single tag (with optional closing tag or quick-closing) — or , or — jQuery creates the element using the native JavaScript function.
When passing in complex HTML, some browsers may not generate a DOM that exactly replicates the HTML source provided. As mentioned, jQuery uses the browser’s property to parse the passed HTML and insert it into the current document. During this process, some browsers filter out certain elements such as , , or elements. As a result, the elements inserted may not be representative of the original string passed.
Filtering isn’t, however, limited to these tags. For example, Internet Explorer prior to version 8 will also convert all properties on links to absolute URLs, and Internet Explorer prior to version 9 will not correctly handle HTML5 elements without the addition of a separate compatibility layer.
To ensure cross-platform compatibility, the snippet must be well-formed. Tags that can contain other elements should be paired with a closing tag:
| 1 |
Tags that cannot contain elements may be quick-closed or not:
|
1 2 |
When passing HTML to , note that text nodes are not treated as DOM elements. With the exception of a few methods (such as ), they are generally ignored or removed. E.g:
|
1 2 |
This behavior is expected. As of jQuery 1.9.0 (and unless using the ), requires the HTML string to start with a (i.e text nodes cannot appear at the front of the HTML string).
As of jQuery 1.4, the second argument to can accept a plain object consisting of a superset of the properties that can be passed to the .attr() method.
Important: If the second argument is passed, the HTML string in the first argument must represent a simple element with no attributes. As of jQuery 1.4, any event type can be passed in, and the following jQuery methods can be called: val, css, html, text, data, width, height, or offset.
As of jQuery 1.8, any jQuery instance method (a method of ) can be used as a property of the object passed to the second parameter:
|
1 2 3 4 5 6 7 8 |
The name must be quoted in the object since it is a JavaScript reserved word, and cannot be used since it refers to the DOM property, not the attribute.
While the second argument is convenient, its flexibility can lead to unintended consequences (e.g. calling the method instead of setting the size attribute). The previous code block could thus be written instead as:
|
1 2 3 4 5 6 7 8 |
Использование переменных шаблона
Шаблоны не являются сценариями JavaScript. Любое содержимое, которое вы добавляете в элемент script, считается частью шаблона и будет включаться в выходной результат. Чтобы сделать шаблоны более гибкими, вам предоставляется небольшое количество контекстных переменных, которые можно использовать в дескрипторах заполнителей. Краткое описание этих переменных содержится в таблице ниже:
| Переменная | Описание |
|---|---|
| $data | Возвращает текущий элемент данных |
| $item | Возвращает текущий экземпляр шаблона |
| $ | Функция $() библиотеки jQuery |
Использование переменной $data
Переменная $data возвращает текущий элемент данных, к которому применяется шаблон. Например, используемая переменная $data будет поочередно ссылаться на каждый из объектов, соответствующих отдельным видам цветов. Для получения данных в предыдущем примере в шаблоне использовался тернарный условный оператор. Такой подход вполне допустим, однако чтение получаемых при этом шаблонов часто вызывает затруднения, чего, разумеется, желательно не допускать.
Я всегда стараюсь уменьшить объем кода шаблона до необходимого минимума и поэтому предпочитаю использовать переменную $data внутри функций JavaScript, которые затем вызываю из шаблона. Соответствующий демонстрационный пример приведен ниже:
В этом примере определяется функция stockDisplay(), возвращающая значение, которое должно отображаться в элементе input. Аргументом этой функции является объект данных, который мы получаем внутри шаблона с использованием переменной $data. Учитывая, что речь идет всего лишь о простом тернарном операторе, разница в удобочитаемости кода по сравнению с предыдущим вариантом не очень значительна, но в случае более сложных выражений или в случае многократного использования выражения в пределах одного шаблона она будет гораздо более ощутимой.
Определяя функции, которые будут вызываться из шаблона, будьте внимательны. Дело в том, что такие функции должны определяться до вызова метода tmpl(). Я всегда стараюсь помещать их в конце элемента script, но если функция должна находиться внутри обработчика события ready, то непременно следует убеждаться в том, что она была ранее определена. Другой распространенной ошибкой является то, что функцию часто определяют внутри шаблона.
Использование функции $() внутри шаблона
В применяемых внутри шаблона заполнителях можно использовать функцию $() библиотеки jQuery, однако при этом очень важно не забывать, что элементы, генерируемые посредством шаблона, не присоединяются к документу и поэтому не будут попадать в наборы выбранных элементов jQuery. Я редко использую указанную возможность, поскольку обычно меня в большей степени интересуют элементы и связанные с ними данные, которые я генерирую самостоятельно
Использование переменной $item
Объект, возвращаемый переменной $item, решает несколько задач. Первая из них — обеспечение возможности обмена дополнительными данными между сценарием JavaScript и шаблоном. Соответствующий пример приведен ниже:
В этом примере мы создаем объект options, для которого определяются свойство (discount) и метод (stockDisplay()). Затем этот объект передается методу tmpl() в качестве второго аргумента. Доступ к свойствам и методам объекта из шаблона обеспечивает переменная $item. Как видите, для обработки скидки в цене, здесь используется свойство discount объекта options.
Хочу обратить ваше внимание на необходимость включения префикса $ в имена контекстных переменных: $item и $data. Такой же префикс обязателен и в конструкции дескриптора шаблона ${…}, используемой для подстановки значений в шаблон
Пропуск любого из этих префиксов является одной из наиболее распространенных ошибок.
О других применениях этого объекта мы поговорим далее.
jQuery Core — All 3.x Versions
- jQuery Core 3.5.1 — uncompressed, minified, slim, slim minified
- jQuery Core 3.5.0 — uncompressed, minified, slim, slim minified
- jQuery Core 3.4.1 — uncompressed, minified, slim, slim minified
- jQuery Core 3.4.0 — uncompressed, minified, slim, slim minified
- jQuery Core 3.3.1 — uncompressed, minified, slim, slim minified
- jQuery Core 3.3.0 — uncompressed, minified, slim, slim minified
- jQuery Core 3.2.1 — uncompressed, minified, slim, slim minified
- jQuery Core 3.2.0 — uncompressed, minified, slim, slim minified
- jQuery Core 3.1.1 — uncompressed, minified, slim, slim minified
- jQuery Core 3.1.0 — uncompressed, minified, slim, slim minified
- jQuery Core 3.0.0 — uncompressed, minified, slim, slim minified
How to build your own jQuery
First, clone the jQuery git repo.
Then, enter the jquery directory and run the build script:
cd jquery && npm run build
The built version of jQuery will be put in the subdirectory, along with the minified copy and associated map file.
If you want to create custom build or help with jQuery development, it would be better to install grunt command line interface as a global package:
Make sure you have installed by testing:
Now by running the command, in the jquery directory, you can build a full version of jQuery, just like with an command:
There are many other tasks available for jQuery Core:
Modules
Special builds can be created that exclude subsets of jQuery functionality.
This allows for smaller custom builds when the builder is certain that those parts of jQuery are not being used.
For example, an app that only used JSONP for and did not need to calculate offsets or positions of elements could exclude the offset and ajax/xhr modules.
Any module may be excluded except for , and . To exclude a module, pass its path relative to the folder (without the extension).
Some example modules that can be excluded are:
- ajax: All AJAX functionality: , , , , , transports, and ajax event shorthands such as .
- ajax/xhr: The XMLHTTPRequest AJAX transport only.
- ajax/script: The AJAX transport only; used to retrieve scripts.
- ajax/jsonp: The JSONP AJAX transport only; depends on the ajax/script transport.
- css: The method. Also removes all modules depending on css (including effects, dimensions, and offset).
- css/showHide: Non-animated , and ; can be excluded if you use classes or explicit calls to set the property. Also removes the effects module.
- deprecated: Methods documented as deprecated but not yet removed.
- dimensions: The and methods, including and variations.
- effects: The method and its shorthands such as or .
- event: The and methods and all event functionality.
- event/trigger: The and methods.
- offset: The , , , , and methods.
- wrap: The , , , and methods.
- core/ready: Exclude the ready module if you place your scripts at the end of the body. Any ready callbacks bound with will simply be called immediately. However, will not be a function and or similar will not be triggered.
- deferred: Exclude jQuery.Deferred. This also removes jQuery.Callbacks. Note that modules that depend on jQuery.Deferred(AJAX, effects, core/ready) will not be removed and will still expect jQuery.Deferred to be there. Include your own jQuery.Deferred implementation or exclude those modules as well ().
- exports/global: Exclude the attachment of global jQuery variables ($ and jQuery) to the window.
- exports/amd: Exclude the AMD definition.
The build process shows a message for each dependent module it excludes or includes.
AMD name
As an option, you can set the module name for jQuery’s AMD definition. By default, it is set to «jquery», which plays nicely with plugins and third-party libraries, but there may be cases where you’d like to change this. Simply set the option:
grunt custom --amd="custom-name"
Or, to define anonymously, set the name to an empty string.
grunt custom --amd=""
Custom Build Examples
To create a custom build, first check out the version:
git pull; git checkout VERSION
Where VERSION is the version you want to customize. Then, make sure all Node dependencies are installed:
npm install
Create the custom build using the option, listing the modules to be excluded.
Exclude all ajax functionality:
grunt custom:-ajax
Excluding css removes modules depending on CSS: effects, offset, dimensions.
grunt custom:-css
Exclude a bunch of modules:
grunt custom:-ajax/jsonp,-css,-deprecated,-dimensions,-effects,-offset,-wrap
There is also a special alias to generate a build with the same configuration as the official jQuery Slim build is generated:
grunt custom:slim
События мыши
| Метод | Описание |
|---|---|
| .click() | Привязывает JavaScript обработчик событий «click» (клик левой кнопкой мыши), или запускает это событие на выбранный элемент. |
| .contextmenu() | Привязывает JavaScript обработчик событий «contextmenu» (вызов контекстного меню на элементе — клик правой кнопкой мыши), или запускает это событие на выбранный элемент. |
| .dblclick() | Привязывает JavaScript обработчик событий «dblclick» (двойной клик левой кнопкой мыши), или запускает это событие на выбранный элемент. |
| .hover() | Связывает один или два обработчика событий для элемента, которые будут выполнены, когда указатель мыши находится на элементе и при его отведении. |
| .mousedown() | Привязывает JavaScript обработчик событий «mousedown» (нажатие кнопки мыши на элементе), или запускает это событие на выбранный элемент. |
| .mouseenter() | Привязывает JavaScript обработчик событий «mouseenter» (срабатывает, когда указатель мыши заходит на элемент), или запускает это событие на выбранный элемент. |
| .mouseleave() | Привязывает JavaScript обработчик событий «mouseleave» (срабатывает, когда указатель мыши выходит из элемента), или запускает это событие на выбранный элемент. |
| .mousemove() | Привязывает JavaScript обработчик событий «mousemove» (срабатывает, когда указатель мыши перемещается внутри элемента), или запускает это событие на выбранный элемент. |
| .mouseout() | Привязывает JavaScript обработчик событий «mouseout» (срабатывает, когда указатель мыши покидает элемент), или запускает это событие на выбранный элемент. |
| .mouseover() | Привязывает JavaScript обработчик событий «mouseover» (срабатывает, когда указатель мыши входит в элемент), или запускает это событие на выбранный элемент. |
| .mouseup() | Привязывает JavaScript обработчик событий «mouseup» (срабатывает, когда указатель мыши находится над элементом и кнопка мыши отпущена), или запускает это событие на выбранный элемент. |
5 — $(‘#box’).addClass(‘wrap’);
jQuery обеспечивает удобный API для модификации имени класса для набора элементов.
Модерн
document.querySelector('#box').classList.add('wrap');
Новая техника использует новый API для добавления, удаления и переключения класса , , и ).
var container = document.querySelector('#box');

container.classList.add('wrap');
container.classList.remove('wrap');
container.classList.toggle('wrap');
Наследие
box = document.getElementById('box'),

    hasClass = function (el, cl) {
        var regex = new RegExp('(?:\\s|^)' + cl + '(?:\\s|$)');
        return !!el.className.match(regex);
    },

    addClass = function (el, cl) {
        el.className += ' ' + cl;
    },

    removeClass = function (el, cl) {
        var regex = new RegExp('(?:\\s|^)' + cl + '(?:\\s|$)');
        el.className = el.className.replace(regex, ' ');
    },

    toggleClass = function (el, cl) {
        hasClass(el, cl) ? removeClass(el, cl) : addClass(el, cl);

    };

addClass(box, 'drago');
removeClass(box, 'drago');
toggleClass(box, 'drago'); // Если элемент не имеет класса 'drago', добавляем его.
Обратная совместимость требует достаточно много действий.
Assignment
Assignment works a little differently in jq than in most
programming languages. jq doesn’t distinguish between references
to and copies of something — two objects or arrays are either
equal or not equal, without any further notion of being «the
same object» or «not the same object».
If an object has two fields which are arrays, and ,
and you append something to , then will not get
bigger. Even if you’ve just set . If you’re used to
programming in languages like Python, Java, Ruby, Javascript,
etc. then you can think of it as though jq does a full deep copy
of every object before it does the assignment (for performance,
it doesn’t actually do that, but that’s the general idea).
Плюс: простой доступ к странице
В чистом JavaScript обратиться к объекту на странице можно одним из способов:
document.getElementById(«myElement»)document.getElementsByTagName(«td»)document.getElementsByClassName(«myClass»)
и еще несколько подобных
В jQuery то же самое делает одна прекрасная команда. Заодно она же совмещает в себе кучу других функций. Фактически она говорит jQuery: «Возьми ЭТО и сделай с ним что-то»:
$(«myElement»)
Поэтому какие-то простые манипуляции с объектами на странице выглядят элегантнее именно с jQuery. Это не значит, что их нельзя делать с простым JavaScript — можно. Но это не так красиво.
Пример манипуляции с объектами
Представьте, что у нас есть страница, на которой есть важные плашки. Такие же, как на этой, и у всех задан класс “SomeClass”. И в зависимости от времени суток, браузера или настроения программиста сайт должен эти плашки скрывать, добавлять новые или как-то их менять. Вот, что можно, к примеру, с ними делать:
удалять все плашки:
var $elem = $(«.SomeClass») //Выбираем элементы.
$elem.remove(); //Удаляем их.
добавлять новые:
$elem.prepend($someOtherElem);
вставлять ещё одни перед ними:
$elem.before($someOtherElem);
заменять их на что-то другое:
$elem.replaceWith($someOtherElem);
и просто плавно показывать на экране:
$elem.fadeIn();
jq Functions
jq also has built-in “functions”. Returning to the previous object iteration example — let’s say we wanted get the keys of the object (not the values) as an array:
echo '{ "a": 1, "b": 2 }' | jq 'keys | .[]'
which will return . Note that we’re also using the pipe operator, which works the same in jq as it does in bash — it takes the output from the left and passes it as input to the right.
Another handy function for arrays and objects is the function, which returns the array’s length property or the number of properties on an object.
echo '' | jq 'length'
You can get even fancier and create intermediary arrays and objects on the fly. Here, I’m combining the keys of the and objects (from a package.json file) into an array, flattening it, and then getting the length.
jq -r ' | flatten | length' package.json
That returns the number of and a package.json contains.
Let’s use it for real now
What if I wanted to audit my dependencies and remove anything that’s not being used? Unused dependencies slow down npm installs for everyone and is just messy. I could manually grep usages of each dependency (via or in my IDE), but if you have a lot of dependencies that gets tedious fast, so let’s automate it.
See numbered comments below for an explanation.
Here’s how the grep flags work:
- and narrow the files that get searched
- means recursive, tells it to grep all matching files
- colorizes the output
- displays line numbers
I have to it so that a subshell can see it. If you want to call a custom function, you have to call it in a subshell for some reason
is for “raw-output”, so no quotes around values, which makes it suitable for processing in other bash commands. We get the dependency names as an array (this is equivalent to ) in node.js)
Then we pipe that to xargs which handles setting up a grep for each lines. Here’s how the xargs flags all work:
- tells it to echo the constructed command; useful for debugging
- {} defines the replacement string where the dependency string will get placed
- defines the concurrency, so 4 concurrent greps
- we tell it to start a bash subshell where our grep_dep function is called with it’s args
There’s more that could be done to the grep-ing in that script to make it more robust, but that’s the basic gist.
Определение и применение
jQuery метод .is() проверяет текущий соответствующий набор элементов относительно селектора, элемента, или объекта jQuery и возвращает логическое значение true, если хотя бы один из этих элементов соответствует приведенному значению.
Обращаю Ваше внимание, что в отличие от других методов фильтрации метод .is() не создает новый объект jQuery, а вместо этого он позволяет проверить содержимое существующего объекта jQuery без его изменения. Эта особенность может быть полезной при работе с обработчиками событий
До версии jQuery 1.7 такие позиционные селекторы как :first(), :gt(), или :even(), используемые в методе .is() для сопоставления с элементами, приводили к некорректному результату, так как сравнение происходило по коллекции jQuery, а не всему документу.
Не смотря на то, что начиная с версии jQuery 1.7 библиотека jQuery корректно работает с позиционными селекторами, разработчики библиотеки рекомендуют не использовать (когда это возможно) позиционные селекторы, они являются дополнением jQuery, а не стандартом W3C.
Плюс: плагины на любой случай
Что бы вы ни хотели сделать на веб-странице, скорее всего, для этого уже есть готовые плагины на jQuery. Формы подписки, всплывающая реклама, захват телефонного номера — всё это уже есть и доступно за пару команд.
Несколько примеров:
Scrollpane — кроссбраузерный скролбар любого элемента на странице;
jReject — проверяет, не устарел ли используемый браузер;
GridScrolling — навигация по сайту с помощью клавиш;
FlickerPlate — плагин для слайдеров с поддержкой сенсорных экранов;
Animsition — создание анимированной загрузки страниц на сайте;
SlideBars — создание адаптивного меню на сайте
и ещё тысячи готовых плагинов.
Перебор текущих элементов (.each)
Синтаксис метода each (пременяется только к выбранным элементам):
.each(function);
// function - функция, которая будет выполнена для каждого элемента текущего объекта
Разберём, как работает метод на следующем примере (переберём элементы ):
<div id="id1"></div>
<div id="id2">
  <p></p>
  <hr>
  <p></p>
  <div id="id3"></div>
</div>

<script>
// после загрузки DOM страницы выполнить
$(function(){

  // перебрать элементы div на странице
  $('div').each(function (index, element) {
    // index (число) - текущий индекс итерации (цикла)
      // данное значение является числом
      // начинается отсчёт с 0 и заканчивается количеству элементов в текущем наборе минус 1
    // element - содержит DOM-ссылку на текущий элемент

    console.log('Индекс элемента div: ' + index + '; id элемента = ' + $(element).attr('id'));
  });

});

// Результат:
  // Индекс элемента div: 0; id элемента = id1
  // Индекс элемента div: 1; id элемента = id2
  // Индекс элемента div: 2; id элемента = id3

</script>
В вышеприведённом примере метод each использует текущий набор (элементы, выбранные посредством селектора ). В качестве обработчика метода each всегда выступает функция, которая будет выполнена для каждого элемента текущего набора (в данном случае для каждого элемента ). Данная функция имеет 2 необязательных параметра. Один из них (index) представляет собой порядковый номер текущей итерации, а второй (element) — DOM ссылку на текущий элемент. Кроме этого внутри функции доступно ключевое слово , которое также как и второй параметр, содержит DOM-ссылку на текущий элемент.
Например, выведем в консоль значение атрибута для всех элементов на странице:
$('a').each(function() {
  console.log($(this).attr('href'));
});
Например, выведем в консоль все внешние ссылки, расположенные на странице:
$('a').each(function() {
  var link = $(this).attr('href');
  if ((link.indexOf('http://') == 0) || (link.indexOf('https://') == 0)) {
    console.log('href ссылки = ' + link);
  }
});

// Если на странице расположены следующие ссылки:
  // <a href="https://www.yandex.ru/">Яндекс</a>
  // <a href="post/2898">Как работает JavaScript?</a>
  // <a href="http://getbootstrap.com/">Bootstrap</a>
// То в консоли увидим следующий результат:
  // https://www.yandex.ru/
  // http://getbootstrap.com/
Например, рассмотрим, как организовать цикл each по элементам DOM, имеющих класс (переберём все элементы одного класса).
<!-- HTML-код -->
<div class="name">Raspberry pi</div>
<div>single-board compute</div>
<div class="name">Intel Galileo Gen2</div>
<div class="price">19$</div>
<div class="name">Pine A64 Plus</div>

<script>
// с помощью функции jQuery.each ($.each)
$.each($('.name'),function(index,data) {
  console.log('Порядковый номер: ' + index + ' ; Содержимое: ' +$(data).text());
});

// с помощью метода jQuery .each
$('.name').each(function(index,data) {
  console.log('Порядковый номер: ' + index + ' ; Содержимое: ' +$(data).text());
});

// Получим следующий ответ:
//   Порядковый номер: 0 ; Содержимое: Raspberry pi
//   Порядковый номер: 1 ; Содержимое: Intel Galileo Gen2
//   Порядковый номер: 2 ; Содержимое: Pine A64 Plus
</script>
Например, разберём, как перебрать все элементы на странице.
<script>
$('*').each(function() {
  console.log(this);
});
</script>
Например, выведем значение всех элементов на странице.
$('input').each(function() {
  console.log($(this).val());
});
Например, переберём все дочерние элементы, расположенные в с (each children).
<!-- HTML список -->
<ul id="myList">
  <li>HTML</li>
  <li>CSS</li>
  <li>JavaScript</li>
</ul>

<script>
$('ul#myList').children().each(function(){
  console.log($(this).text());
});

// Результат:
//   HTML
//   CSS
//   JavaScript
</script>
Рассмотрим способ, с помощью которого можно определить последний индекс (элемент) в методе jQuery .
// выбираем элементы
var myList =  $('ul li');
// определяем количество элементом в выборке
var total = myList.length;
// осуществляем перебор выбранных элементов
myList.each(function(index) {
  if (index === total - 1) {
    // это последний элемент в выборке
  }
});
link About the Code
jQuery is provided under the MIT license.
The code is hosted and developed in the jQuery GitHub repository. If you’ve spotted some areas of code that could be improved, please feel free to discuss it on the Developing jQuery Core Forum. If you’d like to participate in developing jQuery, peruse our contributor site for more information.
To find and download plugins developed by jQuery contributors, please visit the Plugins site. Plugin authors are responsible for maintenance of their plugins. Feedback on plugins should be directed to the plugin author, not the jQuery team.
Build from Git
Note: To just use the latest work-in-progress version of jQuery, please try the jQuery Pre-Release Build described above.
All source code is kept under Git revision control, which you can browse online. The repository’s README has more information on building and testing your own jQuery, as well as instructions on creating a custom build that excludes some APIs to reduce file size.
If you have access to Git, you can connect to the repository here:
|
1 |
You can also check out and build a specific version of jQuery from GitHub:
|
1 2 |
The README file for a specific version will have instructions for building that version, as the process has changed over time.
Список функций
| Название | Описание |
| $.contains() | Проверяет, содержится ли один элемент страницы внутри другого. |
| $.extend() | Объединяет два или более javascript-объекта. |
| $.globalEval() | Выполняет заданный скрипт в глобальной области видимости. |
| $.grep() | Ищет в заданном массиве элементы удовлетворяющие условиям. |
| $.inArray() | Ищет в заданном массиве конкретный элемент и возвращает его индекс (или -1 в случае отсутствия элемента). |
| $.isArray() | Проверяет, является ли заданный элемент массивом. |
| $.isEmptyObject() | Проверяет наличие (точнее отсутствие) содержимого в заданном объекте. |
| $.isFunction() | Проверяет, является ли заданный элемент функцией. |
| $.isNumeric() | Проверяет, является ли заданный элемент числом. |
| $.isPlainObject() | Проверяет, является ли заданный элемент пользовательским объектом (задан средствами «{}» или «new Object»). |
| $.isWindow() | Проверяет, является ли заданный элемент объектом типа window. |
| $.isXMLDoc() | Проверяет, находится ли DOM-объект внутри XML-документа (или сам является XML-документом). |
| $.makeArray() | Конвертирует массиво подобные объекты, в массивы. |
| $.map() | Выполняет заданную функцию для каждого элемента массива или каждого поля объекта в отдельности. |
| $.merge() | Объединяет содержимое нескольких массивов, записывая его в первый из них. |
| $.noop() | Пустая функция. |
| $.parseJSON() | Конвертирует строку с json-данными в javascript-объект. |
| $.parseXML() | Конвертирует строку xml в xml-документ. |
| $.proxy() | По заданной функции, создает другую, внутри которой переменная this будет равна заданному значению. |
| $.trim() | Удаляет пробелы из начала и конца заданной строки. |
| $.type() | Определяет класс заданного объекта (речь идет о внутренних классах javascript: string, boolean и т.д.). |
| $.unique() | Сортирует заданный массив с DOM-элементами, выстраивая их в порядке расположения в DOM, а так же удаляя повторения. |