Обзор графического редактора gimp
Содержание:
- Writing to files and buffers
- Что представляет собой редактор Gimp
- [править] Нейтральная точка зрения
- GIMP for macOS
- Splash Images
- GEGL and babl
- What’s next
- Troubleshooting
- Text tool supports CJK and more writing systems
- Crop an Image
- Donate to The Project
- Возможности редактора Gimp
- Linear color space workflow
- The Perl Server and stand-alone scripts
- Step 1
- Layers and masks
- Tips
- How You Can Help
- Options
Writing to files and buffers
The image can be written to disk in PNG, JPEG or BMP format (based on the save path extension or if no extension is provided the original image’s MIME type which, if not available, defaults to PNG) using:
image.write(path, cb);image.writeAsync(path);
The original extension for an image (or «png») can accessed as using . The following will save an image using its original format:
var file ='new_name.'+image.getExtension();var file ='new_name';image.write(file);
A PNG, JPEG or BMP binary Buffer of an image (e.g. for storage in a database) can be generated using:
image.getBuffer(mime, cb);image.getBufferAsync(mime);
For convenience, supported MIME types are available as static properties:
Jimp.MIME_PNG;Jimp.MIME_JPEG;Jimp.MIME_BMP;
If is passed as the MIME type then the original MIME type for the image (or «image/png») will be used. Alternatively, will return the original MIME type of the image (or «image/png»).
A Base64 data URI can be generated in the same way as a Buffer, using:
image.getBase64(mime, cb);image.getBase64Async(mime);
The quality of JPEGs can be set with:
image.quality(n);
The format of PNGs can be set with:
image.rgba(bool);image.filterType(number);image.deflateLevel(number);Jimp.deflateStrategy(number);
For convenience, supported filter types are available as static properties:
Jimp.PNG_FILTER_AUTO;Jimp.PNG_FILTER_NONE;Jimp.PNG_FILTER_SUB;Jimp.PNG_FILTER_UP;Jimp.PNG_FILTER_AVERAGE;Jimp.PNG_FILTER_PATH;
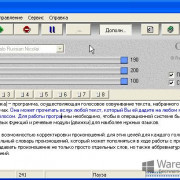
Что представляет собой редактор Gimp
Графический редактор Gimp появился на свет в 1995 году. Проект не имеет официальной компании, ответственной за выпуск новых версий и поддержку старых. Эти функции исполняет сообщество разработчиков, состоящее из группы добровольцев. В первые 10 лет своего существования проект не имел единого представления о том, каким он должен быть для конечного потребителя. Лишь в 2005 году был разработан единый стандарт и составлены принципы, которым разработчики стараются следовать и по сегодняшний день. Программа является полностью бесплатной и распространяется с открытой лицензией. Это означает, что при желании вы можете стать частью сообщества разработчиков и выпускать собственные модификации без нарушения авторских прав.


[править] Нейтральная точка зрения
Гимп на венде
В настоящее время по набору функций является хорошей заменой вышедшему в далёком 1999 году фотошопу 5.5, причём по удобству пользования его (а порой и более поздние версии) превосходит. Это значит, что если вам нужно только уменьшить фотку и сделать ей обработку или коррекцию средней сложности, ставьте гимп смело — абсолютно все инструменты для этого в нём есть. Разумеется, внешний вид у него от фотошопа, мягко говоря, отличается, поэтому все менюшки и кнопочки придётся изучать заново, однако это не так сложно, и овладевание основными из них займёт не более получаса.
А вот ряд серьёзных возможностей, которые есть в последних фотошопах, у гимпа отсутствуют. Например, нет Shadow/Highlight, нет возможности делать кошерную резкость, а также убирать шумы и выпученности от объектива посредством хороших и годных плагинов PTlens и NeatImage (но есть возможность эти плагины, так же как и кисти, прикрутить, что доставляет; впрочем, в ubuntu/mint/debian можно просто набрать в консоли «sudo apt-get install gimp-ufraw» и получить встроенный в gimp RAW-конвертер со всем этим и другими вкусными фичами. Аналогично и в openSUSE: #zypper in gimp-ufraw). Профессиональные Дизайнеры, безусловно, продолжат этот список и своими узкоспециализированными заморочками, для всех же остальных по-прежнему действует резюме, что для действительно качественной и серьёзной обработки фотографий пока подходит исключительно фотожоп.
GIMP for macOS
Note: the currently available package provides GIMP 2.10.14 and has not yet updated to the latest version, GIMP 2.10.22. We’re working on that, please check back later.
Download GIMP 2.10.14
via BitTorrent
Download GIMP 2.10.14
directly
The download links above will attempt to download GIMP from one of our trusted mirror servers.
If the mirrors do not work or you would rather download directly from our server, you can get the direct download here.
Supported OS: macOS 10.9 Mavericks or over
Since the 2.8.2 version, GIMP runs on OSX natively. No X11 environment is required.
Native build
The official GIMP 2.10 DMG installer (linked above) is a stock GIMP build without any add-ons. Just open the downloaded DMG and drag and drop GIMP into your «Applications» folder.
The SHA256 hash sum for is:
52654d85f894834f6c134c724beff3eddf212a1bda317299314322cfeff97e52
Check it on
VirusTotal:
Macports
An easy way to compile and install GIMP and other great Free software on your Mac is by using Macports. The installer allows you to choose from a large directory of packages. To install gimp using Macports, you simply do once you have Macports installed.
Last we checked, the GIMP
port file pointed to the current stable release
and we have reports from people who’ve built GIMP
successfully this way.
Download Macports
Homebrew
Homebrew is similar to Macports and provides packages (aka formulas) to install, either by compiling them from source or by using pre-made binaries. There are indications that there is now a formula for GIMP, installable with: .
Download Homebrew
NOTE! Please be aware that it was announced recently that Homebrew is using analytics.
To turn this off in homebrew then run:
You can read more about this on Brew Analytics.
Fink
Fink is a package repository that offer mostly precompiled binaries. It provides the apt-get command known to e.g. Debian and Ubuntu users, and installing GIMP is as easy as once you have installed the Fink installer.
If there’s no binary package, then will compile GIMP from source.
Disclaimer: we haven’t been able to determine if it is
possible to install or build recent GIMP from Fink.
Last we checked, GIMP 2.6.12 appears to be the most recent GIMP package that is offered there.
Splash Images
GIMP comes with a default image for the splash screen but it allows system administrators and users to customize the splash screen by providing other images. The image to be used with the splash screen is chosen as follows:
-
GIMP tries to load a random splash screen from the directory $HOME/.gimp-2.6/splashes.
-
It then falls back to using $HOME/.gimp-2.6/gimp-splash.png.
-
If the user didn’t install any custom splash images, a random image is picked from /usr/share/gimp/2.0/splashes.
-
As a last resort, GIMP uses the default splash image located at /usr/share/gimp/2.0/images/gimp-splash.png.
GEGL and babl
Both babl and GEGL have been ported to the Meson build system and now use
Gitlab CI for continuous integration. This has little significance for
end-users but makes developers’ life easier in many ways.
There has been a ton of other changes and improvements in GEGL since the
previous release. Here are some of the most interesting ones.
GEGL now makes a better use of available CPU cores on more operations
thanks to newly added dynamic computation of per-operation thread cost.
The built-in GEGL UI has superceded the older built-in ‘gcut’ video editor,
so the latter is now removed. Playing back video has been improved: GEGL
now uses nearest neighbor interpolation while decoding for realtime playback
of HD video content, it now also uses frame cache for rendered video frames.
Moreover, you can now also use external file managers to drag and crop
content into collections. See the updated
NEWS file
for more details.
As for babl, it now supports Yu’v’ (CIE 1976 UCS) color model, handles
grayscale ICC color profiles, and uses AVX2 acceleration for some
linear-to-float conversions.
Alpha handling in babl has been slightly revamped. The library is now using the
terms ‘associated alpha’ and ‘separate alpha’, all of nonpremultiplied-,
premultiplied- and nonassociated- alpha are now considered deprecated API.
Conversions between associated and separate alpha have been dramatically improved.
Øyvind Kolås has a plan to add a per-image associated/separate alpha switch to
GIMP’s menu once another batch of code changes by Michael Natterer lands to the
master branch.
Here is a lightning talk at CCC where Øyvind investigates the data loss incurred
by going or
and discovers that the special cased
transparent/emissive cases end up lossless:
Øyvind also iterated on new conversions in babl that cover grayscale in all
precisions supported by GIMP for some things, this means that working in
grayscale is an order of magnitude faster than it was before the last babl release.
See here for more
information on the latest release.
Another new project worth mentioning is ctx,
also by Øyvind Kolås. It’s an API inspired by Cairo and HTML5 canvas’ 2D
rendering context. It works on 32-bit microcontrollers like ESP32 and
ARM-CortexM4, and is devised to scale to networked/remote and threaded software rendering.
The ctx library already has support for floating point pixel formats, and
that support is geared to end up generic for gray, RGB, CMYK and other
multi-component formats. The latter is one of the things we’ve been
missing in Cairo.
So this is a very interesting project
that we might consider using for GIMP further along the road. It will be
used in GEGL’s own UI soon enough.
What’s next
While we do maintain the 2.10.x branch and include new features from the
master branch, our full attention really goes to development of what will
become GIMP 3.0. We are considering the release of 2.99.2 in the next
few months to pave the way for regular alpha/beta releases leading up
to a major update of GIMP.
For the time being, don’t forget you can donate to the project and personally
fund several GIMP developers, as a way to give
back and to accelerate GIMP development.
Troubleshooting
Yes, GIMP does support graphic tablets and maps pressure, stroke speed, and
other events to its advanced brush engine properties. However, the version of
the user interface toolkit that GIMP currently relies on (GTK+ 2.x) is broken
beyond repair on Windows and Mac with regards to supporting some advanced input
devices such as Wacom’s.
To fix this, we need to port GIMP to GTK+3 where everything mostly works as
expected. This is a work in progress.
My macOS system doesn’t let me open GIMP. What do I do?
We haven’t yet joined the Apple Developer Program, so the DMG files we provide
are unsigned, hence the “unidentified developer” warning. Please follow the
procedure described in Apple’s knowledge base.
Text tool supports CJK and more writing systems
The Text tool now fully supports advanced input methods for CJK and other
non-western languages. The pre-edit text is now displayed just as expected,
depending on your platform and Input Method Engine. Several input method-related
bugs and crashes have also been fixed.
Contributors: Jehan Pagès…
Experimental tools
Two new tools were incomplete for inclusion to GIMP 2.10 by default, but still
can be enabled. Please note that they are highly experimental and likely to be
broken for you (up to have GIMP crash). We only mention them, because we need
contributors to get them into the releasable state.
N-Point Deformation tool introduces the kind of smooth, as little rigid as
possible warping you would expect physical objects to have.
Seamless Clone tool is aimed to simplify making layered compositions.
Typically when you paste one image into another, there are all sorts of
mismatches: color temperature, brightness etc. This new experimental tool tries
to adapt various properties of a pasted image with regards to its backdrop.
To enable these tools, you need to first enable the Playground page of the
Preferences dialog. Do it by running GIMP with a ‘—show-playground.’ switch
(for Windows, you might want tweaking the path to GIMP in the shortcut properties
accordingly). Then you need to go to Edit -> Preferences -> Playground and
enable the respective options, so that the tools would show up in the toolbox.
We need to stress again that you should only do so either if you are very
curious, or (which we hope for) intend to help us fix them.
Contributors: Marek Dvoroznak, Barak Itkin, Jehan Pagès, Michael Natterer…
Crop an Image
There are numerous reasons you may want to crop an image. You may want to remove useless borders or information for aesthetic reasons, or you may want the focus of the final image to be of some particular detail for instance.
In a nutshell, cropping is just an operation to trim the image down to a smaller region than what you started with:
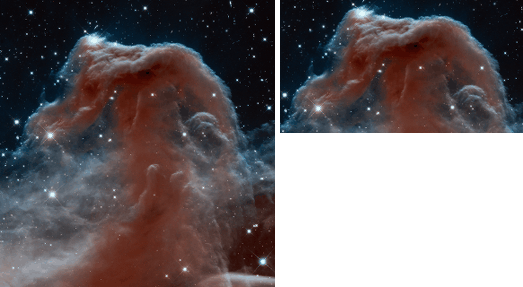
Original image (left), cropped image (right).
The procedure to crop an image is straightforward. You can either get to the Crop Tool through the tools palette:
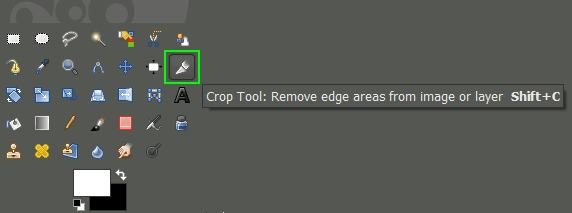
Crop Tool on the Tools Palette.
Or you can access the crop tool through the menus:
Tools → Transform Tools → Crop
Once the tool is activated, you’ll notice that your mouse cursor on the canvas will change to indicate the Crop Tool is being used.
Now you can Left-Click anywhere on your image canvas, and drag the mouse to a new location to highlight an initial selection to crop. You don’t have to worry about being exact at this point, as you will be able to modify the final selection before actually cropping.
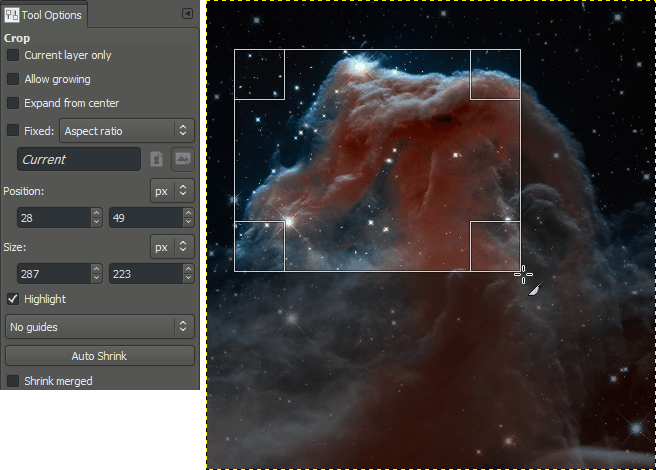
Initial pass with the Crop Tool.
Crop Tool options (left), cropping on the canvas (right).
Donate to The Project
Donating money to the GIMP project is easy! The GNOME Foundation has graciously agreed to act as fiscal agents for us. Contributions to the GIMP project can be made by donating to the GNOME Foundation and specifying the GIMP project as the recipient. The GNOME Foundation is a tax-exempt, non-profit 501(c)(3) organization and all donations are tax-deductible in the USA.
You can choose from several options to support GIMP financially:
Financial help is needed for many different reasons. The annual Libre Graphics Meeting is one of the things that the money will go to. It helps us to get as many GIMP Developers to the conference as possible, so that we can do face-to-face team meetings, plan further development, fix bugs, and write new features.
If applicable, please specify whether you want to remain anonymous. While we usually don’t publish the names of donors, this may be considered for exceptional donations.
Many thanks to all our sponsors!
Paypal
Donate to gimp@gnome.org, this will notify us, and the GNOME board, that funds have been donated to the GIMP project. Credit card donations are also accepted via this route.
Liberapay
Donate to GIMP on Liberapay. Liberapay is a platform run by a non-profit organization allowing monthly crowdfunding (subscription based). See Wikipedia’s page on Liberapay.
Flattr
Donate to GIMP with Flattr. Flattr is a microdonation system. Users are able to pay a small amount every month (minimum 2 euros) and then click Flattr buttons on sites to share the money they paid among those sites, comparable to an Internet tip jar (for more details see Wikipedia’s Flattr article).
Bitcoin
Bitcoin (BTC) is an online digital currency that is based on an open-source, peer-to-peer encryption protocol first described in 2009 by a pseudonymous developer (or developers) Satoshi Nakamoto. Bitcoin is not managed by any government or central authority. Instead, it relies on an Internet-based network (for more details see Wikipedia’s Bitcoin article).
Bitcoin address: 1NVMCeoBfTAJQ1qwX2Dx1C8zkcRCQWwHBq
Cheque
Cheque, made payable to the GNOME Foundation, and sent to:
GNOME Foundation
#117
21 Orinda Way Ste. C
Orinda, CA 94563
USA
with a cover-letter (or a note in the “memo” field) saying it is for the GIMP project.
Возможности редактора Gimp
Графический редактор Gimp позволяет выполнять широкий спектр операций с различными изображениями. Он поддерживает большое количество форматов, имеет множество предустановленных фильтров, кистей и шаблонов. Если вас не устраивает изначальный функционал, его можно расширить за счёт дополнительных модулей. Итак, что же умеет программа?
- Создание и продвинутая обработка графических файлов, фотографий, логотипов, рисунков. Можно менять размер, редактировать цвет, соединить несколько фото в одно, настраивать уровень яркости, контрастности, цветового баланса, искажений, преобразовывать картинки из одного формата в другой.
- Поддержка родного формата XCF, а также JPG, JPEG, GIF, TIFF, PNM, MPEG, PNG, TGA, TIF, PS, XPM, BMP, SGI, PDF, ICO, PCX и множества других. И также предоставляется ограниченная поддержка PSD — оригинального формата Photoshop.
- Рисование. Для создания полноценных рисунков доступен полный набор рабочих инструментов, включающих карандаши, кисти, штампы и другие. Каждый элемент можно тонко настроить, изменить толщину и форму линий, а также прозрачность.
- Создание многослойных проектов. Каждый элемент может наноситься в виде отдельного слоя, который затем в случае необходимости очень легко удалить или подкорректировать. А также доступна полная настройка альфа-канала.
- Полный набор инструментов для преобразования и трансформации: наклон, масштаб, поворот, вращение, отражение.
- Выделение фрагмента изображения. Доступны такие инструменты выделения, как фрагмент свободной формы, эллипс, прямоугольник, а также интеллектуальное выделение.
- Поддержка сканеров и графических планшетов.
- Большое количество встроенных фильтров, возможность как поштучной, так и пакетной обработки файлов.
- История. Все ваши действия хранятся в разделе «История», благодаря чему вы сможете отслеживать все выполненные изменения.
- Анимация. Обработка анимационных файлов формата MNG. Каждый кадр обрабатывается как отдельный слой.
- Многоязычное меню, включая качественный перевод на русский и украинский языки.
- Детальная настройка интерфейса, возможность работать в классическом многооконном меню, так и в более привычном для новичков однооконном.
- Интеграция внешних инструментов, разработанных специально для редактора Gimp.
- Автоматизация ваших операций за счёт скриптов, написанных на языках Perl, Python и Script-Fu.
Linear color space workflow
Another benefit of using GEGL is being able to work on images in a linear RGB
color space as opposed to gamma-corrected (perceptual) RGB color space.
Here is what it boils down to:
- You now have both linear and perceptual versions of most blending modes.
- There is now a linear version of the Color Invert command.
- You can freely switch between the two at any time via Image > Precision submenu.
- You can choose which mode is displayed in the Histogram docker.
- You can apply Levels and Curves filters in either perceptual or linear mode
- When higher than 8-bit per channel precision is used, all channels data is linear.
- You can choose whether the gradient tool should work in perceptual RGB, linear
RGB, or CIE LAB color space
Contributors: Michael Natterer, Øyvind Kolås, Ell…
The Perl Server and stand-alone scripts
So far the scripts have all been started from the menu structure within GIMP. But using Gimp::Fu there is another possibility, and that is to run the scripts from the command line, as a normal Perl program. When run this way the script tries to connect to the Perl-Server, and if it fails it will launch a GIMP of its own. If you plan to run several scripts this way, it is obviously much faster to run the Perl-Server since launching GIMP takes quite a bit of time. The Perl-Server may be started from the Filters/Perl menu.
When a Gimp::Fu script is run from the command line, the result is the same as when it is run through the menus, except that it may be run with the --output parameter. This will save the result to a file instead of displaying it within GIMP. This is great for batch creation of logos, etc.
The filename for the --output has some special magic that allows to set some special image saving parameters, like interlace, quality factor, etc. See the for more detail
Here are two invocations of the scripts declared above, but with output written to a jpg file and a png file.
| perl-gimp-from-shell |
|---|
uni -o /tmp/uni.png --size 100 --color purple basic-logo --font 'utopia 100' -o /tmp/bl.ppm --size 20 --text "Perl rules" |
Another important use of this interface is that it enables running the Perl debugger on the perl scripts.
10.1. A shell for Gimp-Perl
When using the Perl-Server it is not necessary to use Gimp::Fu and the podregister function. Instead you may call Gimp::on_net, which takes as a parameter a reference to a sub routine that is called when your script has connected to a GIMP (or started one up).
For a simple but powerful example of the use of the Gimp without Fu, here is a an interactive Gimp-Perl shell that may be run from the command line:
pg-shell
1 2 3 4 5 6 7 8 9 10 11 12 13 14 15 16 17 |
#!/usr/bin/perl

#  An interactive command line shell to GIMP.
use Gimp;
use Term::ReadLine;

Gimp::on_net {
   $term = new Term::ReadLine("Gimp");
   while( defined ($_ = $term->readline("Gimp> "))) {
        $res = eval($_) . "\n";
        print("Error: $@"), next if $@;
        print "\n";
        Gimp->displays_flush();
    }
 };

 exit Gimp::main;
|
Here is an example of an interactive session with this shell:
| interact |
|---|
Gimp> $img = Gimp::Image->new(100,100,RGB) Gimp> $drw = $img->layer_new(100,100,RGB_IMAGE, "bg", 100, NORMAL_MODE) Gimp> $img->insert_layer($drw,-1, 0) Gimp> Gimp::Display->new($img) Gimp> $drw->edit_clear Gimp> print Gimp::Image->list Gimp::Image->existing(1) |
Step 1
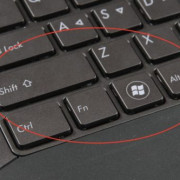
We’ll create a very simple web banner. Let’s start with a new image 468×60 px. Use white as the background color. Create new transparent layer. Select the whole image with Ctrl+A and fill it with black (Ctrl+,). Shrink the selection by 1 px () and delete the selection with Ctrl+K. We created a 1 px frame around out banner.
Now it’s time to put our logo or the main theme picture into the banner. I have prepared a masked-out flower you see on the picture on the left. I just pasted the flower below the border frame, used alpha to selection, created an empty layer below it and filled the selection with black using Ctrl+,. After that I blurred the shadow using Gaussian blur RLE and offset it by 2px to bottom right. I couldn’t resist adding the interlace effect using and a layer mask. In that layer mask i applied a b/w gradient, so that the left of the flower is not interlaced.
This part of the tutorial is not the key element, so feel free to experiment. Once you’re ready flatten the image using the .
Layers and masks
GIMP now ships with two groups of blending modes: legacy (perceptual, mostly
to make old XCF files look exactly as before) and default (mostly linear).
New blend modes are:
- LCH layer modes: Hue, Chroma, Color, and Lightness
- Pass-Through mode for layer groups
- Linear Burn, Vivid Light, Linear Light, Pin Light, Hard Mix, Exclusion, Merge,
and Split
Layers, paths, and channels can also be tagged with color labels to improve
project organization. This will be even more useful once we add multi-layer
selection later on.
Compositing options for layers are exposed to users now, and all layer-related
settings are finally available in the Layer Attributes dialog.
Moreover, if you always need alpha in your layers, you can enable automatic
generation of the alpha channel in imported images upon opening them. See
Edit > Preferences > Image Import & Export page for this and more policies.
Layer groups can finally have masks on:
Tips
How do I draw a straight line?
In any of the drawing tools (Pen, Pencil, etc.), click on one endpoint of the
line. Then hold the shift key and click on the other endpoint.
How do I draw a circle or square?
In the Rectangular or Elliptical selection tool, click in one corner of your
square or circle, then press Shift while dragging toward the other corner. Or
enable the checkbox for Fixed: Aspect Ratio in tool options and make sure the
aspect ratio is set to 1:1 before starting your square or circular selection.
Once you have a selection, Edit->Stroke Selection… will draw a line the
shape of the selection you just made.
For curved selections, like circles, stroking with the Paintbrush paint tool
will usually give a smoother looking line. You can get an even smoother line
by converting the selection to a path (Select->To Path), then using
Edit->Stroke Path… instead of Stroke Selection…
How You Can Help
GIMP is Free Software and a part of the GNU Project. In the free software world, there is generally no distinction between users and developers. As in a friendly neighbourhood, everybody pitches in to help their neighbors. Please consider the time you give in assistance to others as payment.
Ways in which you can help:
- program new features,
- report bugs (errors in the program),
- test existing features and provide feedback,
- add documentation,
- translate GIMP to your own language,
- translate the documentation,
- write tutorials,
- improve this website,
- make artwork for GIMP,
- let people know you used GIMP for your artwork,
- give away copies of GIMP,
- help others to learn to use GIMP, etc.
As you can see, anyone can help.
Development Status
The team is currently busy working on v3.0. This will be a port of GIMP to
GTK+3, much newer and better supported version of the user interface toolkit.
Most of GIMP’s source code is related to the user interface, so this port is a
major undertaking, especially since we shall break API and refactor numerious
parts of the program.
We still need to port more plugins to become GEGL operations. If you are willing
to help with that, please refer to the Porting filters to GEGL
page to see what you could work on.
To get a better understanding of where the project is heading to, which features
are planned etc., please visit the Roadmap page.
Bug Reports
GIMP is not a bug-free application nor is any other application so reporting the bugs that you will encounter is very important to the development, it helps the developers to make GIMP more stable and more bug free.
You don’t have to be a developer or a everyday user to report bugs. It can be hard to report a bug the first time you try it out but don’t just quit the whole bug report if you think it is hard. Instead, look at the bugs page you will find some very good help about this.
Web Development
Creating websites that contain useful information is very important. It is actually just as important as doing bug reports. A website contains a lot of information that is needed for the development to move on and it also contains information that will help the public to understand what the application is all about.
Options
GIMP accepts the following options:
- -h, —help
- Show GIMP command-line options.
- —help-all
- Show all command-line options.
- —help-gtk
- Show GTK+ command-line options.
- —help-gegl
- Show GEGL command-line options.
- -v, —version
- Output version information and exit. When combined with the —verbose option, version information about libraries used by GIMP is shown as well.
- —license
- Output license information and exit.
- —verbose
- Be verbose and create information on standard output.
- -n, —new-instance
- Do not attempt to reuse an already running GIMP instance. Always start a new one.
- -a, —as-new
- Open filenames passed on the command-line as new images, don’t set the filename on them.
- -i, —no-interface
- Run without a user interface.
- -d, —no-data
- Do not load patterns, gradients, palettes, or brushes. Often useful in non-interactive situations where startup time is to be minimized.
- -f, —no-fonts
- Do not load any fonts. No text functionality will be available if this option is used.
- —display _display_
- Use the designated X display.
- -s, —no-splash
- Do not show the splash screen.
- —no-shm
- Do not use shared memory between GIMP and its plug-ins. Instead of using shared memory, GIMP will send the data via pipe. This will result in slower performance than using shared memory.
- —no-cpu-accel
- Do not use CPU accelerations such as MMX or SSE even if GIMP detects that your CPU provides this functionality.
- —session <name>
- Use a different sessionrc for this GIMP session. The given session name is appended to the default sessionrc filename.
- -g, —gimprc <gimprc>
- Use an alternative gimprc instead of the default one. Useful in cases where plug-in paths or machine specs may be different.
- —system-gimprc <gimprc>
- Use an alternate system gimprc file.
- —dump-gimprc
- Output a gimprc file with default settings.
- —debug-handlers
- Enable debugging signal handlers.
- -c, —console-messages
- Do not popup dialog boxes on errors or warnings. Print the messages on the console instead.
- —stack-trace-mode {never|query|always}
- If a stack-trace should be generated in case of fatal signals.
- —pdb-compat-mode {off|on|warn}
- If the PDB should provide aliases for deprecated functions.
- —batch-interpreter <procedure>
- Specifies the procedure to use to process batch events. The default is to let Script-Fu evaluate the commands.
- -b, —batch <command>
- Execute <command> non-interactively. This option may appear multiple times. The <command> is passed to the batch interpreter. When <command> is — the commands are read from standard input.