Introduction
Содержание:
- Global settings
- Align content
- Direction
- Examples
- Lists
- CSS variables
- Класс для придания изображениям гибкости
- Components
- Submit Buttons
- Варианты оформления изображений
- Z-index
- Основы создания таблиц в HTML
- Иконки для полей формы
- Usage
- Custom File Upload
- Адаптивные таблицы
- Custom Select Menu Size
- Bootstrap 3 vs. Bootstrap 4
- Important globals
- What is Bootstrap?
- Community
- Использование сетки
- Важные глобальные переменные
- Шаги для блокировки адаптивного просмотра
Global settings
Bootstrap sets basic global display, typography, and link styles. When more control is needed, check out the textual utility classes.
- Use a that selects the best for each OS and device.
- For a more inclusive and accessible type scale, we assume the browser default root (typically 16px) so visitors can customize their browser defaults as needed.
- Use the , , and attributes as our typographic base applied to the .
- Set the global link color via and apply link underlines only on .
- Use to set a on the ( by default).
These styles can be found within , and the global variables are defined in . Make sure to set in .
Align content
Use utilities on flexbox containers to align flex items together on the cross axis. Choose from (browser default), , , , , or . To demonstrate these utilities, we’ve enforced and increased the number of flex items.
Heads up! This property has no effect on single rows of flex items.
Flex item
Flex item
Flex item
Flex item
Flex item
Flex item
Flex item
Flex item
Flex item
Flex item
Flex item
Flex item
Flex item
Flex item
Flex item
Flex item
Flex item
Flex item
Flex item
Flex item
Flex item
Flex item
Flex item
Flex item
Flex item
Flex item
Flex item
Flex item
Flex item
Flex item
Flex item
Flex item
Flex item
Flex item
Flex item
Flex item
Flex item
Flex item
Flex item
Flex item
Flex item
Flex item
Flex item
Flex item
Flex item
Flex item
Flex item
Flex item
Flex item
Flex item
Flex item
Flex item
Flex item
Flex item
Flex item
Flex item
Flex item
Flex item
Flex item
Flex item
Flex item
Flex item
Flex item
Flex item
Flex item
Flex item
Flex item
Flex item
Flex item
Flex item
Flex item
Flex item
Flex item
Flex item
Flex item
Flex item
Flex item
Flex item
Flex item
Flex item
Flex item
Flex item
Flex item
Flex item
Flex item
Flex item
Flex item
Flex item
Flex item
Flex item
Responsive variations also exist for .
Direction
Set the direction of flex items in a flex container with direction utilities. In most cases you can omit the horizontal class here as the browser default is . However, you may encounter situations where you needed to explicitly set this value (like responsive layouts).
Use to set a horizontal direction (the browser default), or to start the horizontal direction from the opposite side.
Flex item 1
Flex item 2
Flex item 3
Flex item 1
Flex item 2
Flex item 3
Use to set a vertical direction, or to start the vertical direction from the opposite side.
Flex item 1
Flex item 2
Flex item 3
Flex item 1
Flex item 2
Flex item 3
Responsive variations also exist for .
Examples
Wrap the dropdown’s toggle (your button or link) and the dropdown menu within , or another element that declares . Dropdowns can be triggered from or elements to better fit your potential needs.
Any single can be turned into a dropdown toggle with some markup changes. Here’s how you can put them to work with either elements:
Dropdown button
And with elements:
The best part is you can do this with any button variant, too:
Primary
Secondary
Success
Info
Warning
Danger
Similarly, create split button dropdowns with virtually the same markup as single button dropdowns, but with the addition of for proper spacing around the dropdown caret.
We use this extra class to reduce the horizontal on either side of the caret by 25% and remove the that’s added for regular button dropdowns. Those extra changes keep the caret centered in the split button and provide a more appropriately sized hit area next to the main button.
Primary
Toggle Dropdown
Secondary
Toggle Dropdown
Success
Toggle Dropdown
Info
Toggle Dropdown
Warning
Toggle Dropdown
Danger
Toggle Dropdown
Lists
Unstyled
Remove the default and left margin on list items (immediate children only). This only applies to immediate children list items, meaning you will need to add the class for any nested lists as well.
- Lorem ipsum dolor sit amet
- Consectetur adipiscing elit
- Integer molestie lorem at massa
- Facilisis in pretium nisl aliquet
- Nulla volutpat aliquam velit
- Phasellus iaculis neque
- Purus sodales ultricies
- Vestibulum laoreet porttitor sem
- Ac tristique libero volutpat at
- Faucibus porta lacus fringilla vel
- Aenean sit amet erat nunc
- Eget porttitor lorem
Inline
Remove a list’s bullets and apply some light with a combination of two classes, and .
- Lorem ipsum
- Phasellus iaculis
- Nulla volutpat
Description list alignment
Align terms and descriptions horizontally by using our grid system’s predefined classes (or semantic mixins). For longer terms, you can optionally add a class to truncate the text with an ellipsis.
- Description lists
- A description list is perfect for defining terms.
- Euismod
-
Vestibulum id ligula porta felis euismod semper eget lacinia odio sem nec elit.
Donec id elit non mi porta gravida at eget metus.
- Malesuada porta
- Etiam porta sem malesuada magna mollis euismod.
- Truncated term is truncated
- Fusce dapibus, tellus ac cursus commodo, tortor mauris condimentum nibh, ut fermentum massa justo sit amet risus.
- Nesting
-
- Nested definition list
- Aenean posuere, tortor sed cursus feugiat, nunc augue blandit nunc.
CSS variables
Bootstrap 4 includes around two dozen CSS custom properties (variables) in its compiled CSS. These provide easy access to commonly used values like our theme colors, breakpoints, and primary font stacks when working in your browser’s Inspector, a code sandbox, or general prototyping.
Examples
CSS variables offer similar flexibility to Sass’s variables, but without the need for compilation before being served to the browser. For example, here we’re resetting our page’s font and link styles with CSS variables.
Breakpoint variables
While we originally included breakpoints in our CSS variables (e.g., ), these are not supported in media queries, but they can still be used within rulesets in media queries. These breakpoint variables remain in the compiled CSS for backward compatibility given they can be utilized by JavaScript. .
Here’s an example of what’s not supported:
And here’s an example of what is supported:
Класс для придания изображениям гибкости
Так как Bootstrap предназначен для создания адаптивных сайтов, то изображения при построении такой сетки не должны выходить за пределы своего блока (элемента, в который каждое из них помещено).
Чтобы сделать изображения гибкими к ним нужно добавить специальные классы этого фреймворка:
- в Bootstrap 3;
- в Bootstrap 4.
После этого, размеры изображения будут уменьшаться, если его ширина будет больше ширины элемента, в котором оно находится.
<!-- Bootstrap 3 -->
<img src="..." class="img-responsive">

<!-- Bootstrap 4 -->
<img src="..." class="img-fluid">
Эти классы на самом деле выполняют очень простые действия, они применяют к изображению CSS-свойства и .
При необходимости можно не добавлять этот класс к каждому изображению, а выполнить это с помощью CSS. Для этого нужно в свой файл CSS внести одно из следующих CSS-правил:
/* 1 способ - сделать все изображения на странице гибкими, при этом чтобы они отображались как строчно-блочные элементы (inline-block) */
img {
  display: inline-block;
  height: auto;
  max-width: 100%;
}

/* 2 способ - сделать все изображения на странице гибкими, при этом чтобы они отображались на странице как блочные элементы (block) */
img {
  display: block;
  height: auto;
  max-width: 100%;
}
Если необходимо сделать не все изображения на странице гибкими, а только те, которые расположены в определённом блоке, то в этом случае это необходимо определить с помощью CSS-селекторов:
/* например, сделаем гибкими только те изображения, которые расположены в элементе с классом main */
.main img {
  display: block;
  height: auto;
  max-width: 100%;
  /* дополнительно их выровняем по центру */
  margin-left: auto;
  margin-right: auto;
  /* и добавим внешний нижний отступ */
  margin-bottom: 15px;
}
При необходимости изображениям можно задать определённый размер. Осуществляется это с помощью стандартных атрибутов и :
<!-- Гибкое изображение, имеющее ширину 600 пикселей (Bootstrap 3) -->
<img src="..." class="img-responsive" width="600">

<!-- Гибкое изображение, имеющее размер 600x800 пикселей (Bootstrap 4) -->
<img src="..." class="img-fluid" width="600" height="800">
При таком сценарии изображение останется гибким, т.е. его размеры не будут превышать максимальной ширины блока, в котором оно находится.
Components
Many of Bootstrap’s components and utilities are built with loops that iterate over a Sass map. This is especially helpful for generating variants of a component by our and creating responsive variants for each breakpoint. As you customize these Sass maps and recompile, you’ll automatically see your changes reflected in these loops.
Modifiers
Many of Bootstrap’s components are built with a base-modifier class approach. This means the bulk of the styling is contained to a base class (e.g., ) while style variations are confined to modifier classes (e.g., ). These modifier classes are built from the map to make customizing the number and name of our modifier classes.
Here are two examples of how we loop over the map to generate modifiers to the component and all our background utilities.
Responsive
These Sass loops aren’t limited to color maps, either. You can also generate responsive variations of your components or utilities. Take for example our responsive text alignment utilities where we mix an loop for the Sass map with a media query include.
Should you need to modify your , your changes will apply to all the loops iterating over that map.
Submit Buttons
The CSS classes are automatically added to your submit
buttons.
<%= f.submit %>
You can also use the helper, which adds to your
submit button:
<%= f.primary "Optional Label" %>
You can specify your own classes like this:
<%= f.submit "Log In", class: "btn btn-success" %>
If the helper receives a option or a block,
it will be rendered as an HTML button, instead of an input tag. This allows you
to specify HTML content and styling for your buttons (such as adding
illustrative icons to them). For example, the following statements
<%= f.primary "Save changes <span class='fa fa-save'></span>".html_safe, render_as_button: true %>

<%= f.primary do
      concat 'Save changes '
      concat content_tag(:span, nil, class: 'fa fa-save')
    end %>
are equivalent, and each of them both be rendered as:
<button name="button" type="submit" class="btn btn-primary">Save changes <span class="fa fa-save"></span></button>
If you wish to add additional CSS classes to your button, while keeping the
default ones, you can use the option. This is particularly useful
for adding extra details to buttons (without forcing you to repeat the
Bootstrap classes), or for element targeting via CSS classes.
Be aware, however, that using the option will discard any extra classes
you add. As an example, the following button declarations
<%= f.primary "My Nice Button", extra_class: 'my-button' %>

<%= f.primary "My Button", class: 'my-button' %>
will be rendered as
<input type="submit" value="My Nice Button" class="btn btn-primary my-button" />

<input type="submit" value="My Button" class="my-button" />
(some unimportant HTML attributes have been removed for simplicity)
Варианты оформления изображений
В этом разделе рассмотрим примеры оформления изображений с помощью CSS.
1. Пример, в котором показано как можно разместить текст поверх изображения.
<style>
/* CSS */
.img__container {
  position: relative;
  margin: 20px auto 30px auto;
}

.img__container>img {
  display: inline-block;
  max-width: 100%;
  height: auto;
  border-radius: 4px;
  box-shadow: 0 0 6px #9E9E9E;
  border: 4px solid #fff;
}

.img__description {
  position: absolute;
  left: 0;
  right: 0;
  bottom: 0;
  padding: 15px;
  background-color: rgba(255, 255, 255, 0.8);
  border-bottom-left-radius: 4px;
  border-bottom-right-radius: 4px;
}

.img__header {
  font-weight: bold;
  font-size: 1.25em;
}
</style>

<!-- HTML -->
<div class="img__container">
  <img src="image.png" class="image" alt="Описание изображения...">
  <div class="img__description">
    <div class="img__header">Заголовок для текста</div>
    Текст поверх изображения...
  </div>
</div>
2. Рамка для изображения с использованием CSS-свойств , и .
<style>
/* CSS */
.image {
  display: block;
  margin: 20px auto 30px auto;
  max-width: 100%;
  height: auto;
  margin-bottom: 30px;
  outline: 6px dotted #fff;
  outline-offset: -3px;
  border: 8px solid #eee;
}
</style>

<!-- HTML -->
<img src="image.png" class="image" alt="Описание изображения...">
3. Изображение, стилизованное с использованием CSS-свойств и .
<style>
/* CSS */
.image {
  display: block;
  margin: 20px auto 30px auto;
  max-width: 100%;
  height: auto;
  box-shadow: -6px 6px 0 #E0E0E0, -12px 12px 0 #BDBDBD;
  margin-bottom: 30px;
  border: 6px solid #F5F5F5;
}
</style>

<!-- HTML -->
<img src="image.png" class="image" alt="Описание изображения...">
4. Изображение, оформленное с помощью CSS-свойств и .
<style>
/* CSS */
.image {
  display: block;
  max-width: 100%;
  height: auto;
  margin: 20px auto 30px auto;
  border: 5px solid #fff;
  box-shadow: 0 0 10px #9e9e9e;
  border-radius: 4px;
}
</style>

<!-- HTML -->
<img src="image.png" class="image" alt="Описание изображения...">
5. Пример, в котором показана CSS3 техника для установки фонового изображения на весь экран.
/* CSS */
html {
  background: url(bg.jpg) no-repeat center center fixed;
  -webkit-background-size: cover;
  -moz-background-size: cover;
  -o-background-size: cover;
  background-size: cover;
}
6. Пример, в котором элементу установим фоновое изображение.
Установка изображения в качестве фона в Bootstrap выполняется средствами CSS. Для этого используется свойство или .
<style>
/* CSS */
.page-title {
  background-image: url(bg.png);
}
</style>

<!-- HTML -->
<div class="page-title">...</div>
Изображение применять в качестве фона рекомендуется только в том случае, если оно не является частью контента, а используется только для оформления.
Z-index
Several Bootstrap components utilize , the CSS property that helps control layout by providing a third axis to arrange content. We utilize a default z-index scale in Bootstrap that’s been designed to properly layer navigation, tooltips and popovers, modals, and more.
These higher values start at an arbitrary number, high and specific enough to ideally avoid conflicts. We need a standard set of these across our layered components—tooltips, popovers, navbars, dropdowns, modals—so we can be reasonably consistent in the behaviors. There’s no reason we couldn’t have used + or +.
We don’t encourage customization of these individual values; should you change one, you likely need to change them all.
To handle overlapping borders within components (e.g., buttons and inputs in input groups), we use low single digit values of , , and for default, hover, and active states. On hover/focus/active, we bring a particular element to the forefront with a higher value to show their border over the sibling elements.
Основы создания таблиц в HTML
Создание таблицы в HTML начинается с элемента (…), внутри которого помещают шапку (…) и основное содержимое (…). Далее в элемент и помещают строки (…). После этого в элементе (…) создают ячейки с помощью элементов (…) и (…), внутрь которых помещают содержимое, которое должно выводиться в этой ячейке. Элемент (…) обычно используют в шапке, т.к. он придаёт жирное начертание тексту и выравнивает его по центру.
Для объединения ячеек по вертикали и горизонтали предназначены следующие атрибуты:
- — объединяет ячеек по вертикали;
- — объединяет ячеек по горизонтали.
Применять данные атрибуты можно для элементов и .
Например:
<table>
  <thead>
    <tr>
      <th>Заголовок 1</th>
      <th>Заголовок 2</th>
      <th>Заголовок 3</th>
    </tr>
  </thead>
  <tbody>
    <tr>
      <td rowspan="3">Содержимое ячейки</td>
      <td colspan="2">Содержимое ячейки</td>
    </tr>
    <tr>
      <td>Содержимое ячейки</td>
      <td>Содержимое ячейки</td>
    </tr>
    <tr>
      <td>Содержимое ячейки</td>
      <td rowspan="2">Содержимое ячейки</td>
    </tr>
    <tr>
      <td colspan="2">Содержимое ячейки</td>
    </tr>
  </tbody>
</table>
Для указанания названия таблицы используется элемент (…), который размещается внутри элемента сразу же после его открывающего тега.
<table>
  <caption>
    Название таблицы
  </caption>
  ...
</table>
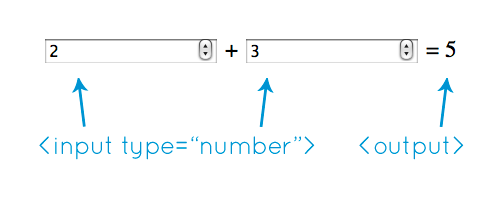
Иконки для полей формы
<form>
    <div class="form-row">
        <div class="form-group col-md-4">
            <label for="input-name" class="sr-only">ФИО</label>
            <div class="input-group">
                <div class="input-group-prepend">
                    <div class="input-group-text">
                        <i class="fas fa-user"></i>
                    </div>
                </div>
                <input type="text" class="form-control" id="input-name" placeholder="Фамилия, имя">
            </div>
        </div>
        <div class="form-group col-md-4">
            <label for="input-email" class="sr-only">Почта</label>
            <div class="input-group">
                <div class="input-group-prepend">
                    <div class="input-group-text">
                        <i class="fas fa-envelope"></i>
                    </div>
                </div>
                <input type="email" class="form-control" id="input-email" placeholder="Введите email">
            </div>
        </div>
        <div class="form-group col-md-4">
            <label for="input-password" class="sr-only">Пароль</label>
            <div class="input-group">
                <div class="input-group-prepend">
                    <div class="input-group-text">
                        <i class="fas fa-lock"></i>
                    </div>
                </div>
                <input type="password" class="form-control" id="input-password" placeholder="Введите пароль">
            </div>
        </div>
        <div class="form-group col-md-12">
            <label for="input-address" class="sr-only">Адрес</label>
            <div class="input-group">
                <div class="input-group-prepend">
                    <div class="input-group-text">
                        <i class="fas fa-map-marker-alt"></i>
                    </div>
                </div>
                <input type="text" class="form-control" id="input-address" placeholder="Адрес доставки">
            </div>
        </div>
    </div>
    <button type="submit" class="btn btn-primary">Отправить</button>
</form>

Usage
bootstrap_form_for
To get started, use the helper in place of the Rails helper. Here’s an example:
<%= bootstrap_form_for(@user) do |f| %>
  <%= f.email_field :email %>
  <%= f.password_field :password %>
  <%= f.check_box :remember_me %>
  <%= f.submit "Log In" %>
<% end %>
This generates the following HTML:
<form accept-charset="UTF-8" action="/users" class="new_user" id="new_user" method="post">
  <div class="form-group">
    <label for="user_email">Email</label>
    <input class="form-control" id="user_email" name="user" type="email">
  </div>
  <div class="form-group">
    <label for="user_password">Password</label>
    <input class="form-control" id="user_password" name="user" type="password">
  </div>
  <div class="form-check">
    <input name="user" type="hidden" value="">
    <input class="form-check-input" id="user_remember_me" name="user" type="checkbox" value="1">
    <label class="form-check-label" for="user_remember_me">Remember me</label>
  </div>
  <input class="btn btn-secondary" name="commit" type="submit" value="Log In">
</form>
bootstrap_form_tag
If your form is not backed by a model, use the . Usage of this helper is the same as , except no model object is passed in as the first argument. Here’s an example:
<%= bootstrap_form_tag url: '/subscribe' do |f| %>
  <%= f.email_field :email, value: 'name@example.com' %>
  <%= f.submit %>
<% end %>
bootstrap_form_with
Note that in Rails 5.1 does not add IDs to form elements and labels by default, which are both important to Bootstrap markup. This behaviour is corrected in Rails 5.2.
To get started, just use the helper in place of . Here’s an example:
<%= bootstrap_form_with(model: @user, local: true) do |f| %>
  <%= f.email_field :email %>
  <%= f.password_field :password %>
  <%= f.check_box :remember_me %>
  <%= f.submit "Log In" %>
<% end %>
This generates:
<form role="form" action="/users" accept-charset="UTF-8" method="post">
<input name="utf8" type="hidden" value="✓" />
<div class="form-group">
<label class="required" for="user_email">Email</label>
<input class="form-control" type="email" value="steve@example.com" name="user" />
</div>
<div class="form-group">
<label for="user_password">Password</label>
<input class="form-control" type="password" name="user" />
<small class="form-text text-muted">A good password should be at least six characters long</small>
</div>
<div class="form-check">
<input name="user" type="hidden" value="">
<input class="form-check-input" id="user_remember_me" name="user" type="checkbox" value="1">
<label class="form-check-label" for="user_remember_me">Remember me</label>
</div>
<input type="submit" name="commit" value="Log In" class="btn btn-secondary" data-disable-with="Log In" />
</form>
supports both the and use cases
in .
Custom File Upload
To create a custom file upload, wrap a container element with a
class of around the input with type=»file». Then add the to it.
Tip: If you use labels for accompanying text, add the class to it.
Note that the value of the for attribute should match the id of the checkbox:
Choose file
Note that you also have to include some jQuery code if you want the name of the file to appear when you select a specific file:
Example
<form> <div class=»custom-file»> <input
type=»file» class=»custom-file-input» id=»customFile»>
<label class=»custom-file-label» for=»customFile»>Choose file</label>
</div></form><script>// Add the following code if
you want the name of the file appear on select
$(«.custom-file-input»).on(«change», function() { var fileName =
$(this).val().split(«\\»).pop();
$(this).siblings(«.custom-file-label»).addClass(«selected»).html(fileName);
});</script>
❮ Previous
Next ❯
Адаптивные таблицы
Сделать таблицу адаптивной можно просто с помощью добавления класса к , благодаря этому у Вас появятся полосы прокрутки таблицы на устройствах с малыми дисплеями (менее 768px). При просмотре таблицы на устройстве с шириной экрана более чем 768px Вы даже не заметите разницы.
Вертикальной подрезки/усечения
Адаптивный таблицы использовать , который загибается любое содержание, которое выходит за пределы нижней или верхней кромками таблица. В частности, это может клип выпадающие меню и другие сторонние виджеты.
Firefox и fieldsets
Firefox имеет какой-то несуразный набор полей для укладки участием что мешает быть таблице адаптивной. Это не может быть изменено без Firefox на конкретные взломать, что мы не дают в Bootstrap:
Для получения дополнительной информации, прочитайте .
| # | Таблица Заголовок | Таблица Заголовок | Таблица Заголовок | Таблица Заголовок | Таблица Заголовок | Таблица Заголовок |
|---|---|---|---|---|---|---|
| 1 | Table cell | Table cell | Table cell | Table cell | Table cell | Table cell |
| 2 | Table cell | Table cell | Table cell | Table cell | Table cell | Table cell |
| 3 | Table cell | Table cell | Table cell | Table cell | Table cell | Table cell |
Обратный стиль
Превратите традиционную таблицу на их стороне с помощью . При использовании обратного стиля, заголовок таблицы будет в первом столбце, первая строка таблицы становится второй колонкой, вторая строка становится третьей колонкой, и т. д.
Содержание заказа и сложных таблицы
Помните, что изменения стиля визуальный порядок содержания. Убедитесь, что вы только применить этот стиль к хорошо сформированные и простые данные таблицы (и в частности, не использовать это для разметка таблицы) с соответствующими таблица заголовков ячеек для каждой строки и столбца.
Кроме того, этот класс не будет работать за таблицы клеток, которые охватывают несколько строк или столбцов (с помощью или атрибуты).
| # | Таблица Заголовок | Таблица Заголовок | Таблица Заголовок | Таблица Заголовок | Таблица Заголовок | Таблица Заголовок |
|---|---|---|---|---|---|---|
| 1 | Table cell | Table cell | Table cell | Table cell | Table cell | Table cell |
| 2 | Table cell | Table cell | Table cell | Table cell | Table cell | Table cell |
| 3 | Table cell | Table cell | Table cell | Table cell | Table cell | Table cell |
Custom Select Menu Size
Use the class to create a small select menu and the class for a large one:
Small Custom Select MenuVolvoFiatAudiDefault Custom Select MenuVolvoFiatAudiLarge Custom Select MenuVolvoFiatAudi
Example
<form> <!— Small —> <select name=»cars» class=»custom-select-sm»>
<option selected>Small Custom Select Menu</option> <option
value=»volvo»>Volvo</option> <option value=»fiat»>Fiat</option>
<option value=»audi»>Audi</option> </select> <!— Large —> <select name=»cars» class=»custom-select-lg»>
<option selected>Large Custom Select Menu</option> <option
value=»volvo»>Volvo</option> <option value=»fiat»>Fiat</option>
<option value=»audi»>Audi</option> </select></form>
Bootstrap 3 vs. Bootstrap 4
Bootstrap 4 is the newest version of Bootstrap; with new components, faster stylesheet and more responsiveness.
Bootstrap 4 supports the latest, stable releases of all major browsers and
platforms. However, Internet Explorer 9 and down is not supported.
If you require IE8-9 support, use Bootstrap 3. It is the most
stable version of Bootstrap, and it is still supported by the team for critical bugfixes and documentation changes. However, no new features will be added to
it.
Droppped icon support: Bootstrap 4 does not support BS3 Glyphicons. Use Font-Awesome or other icon libraries instead.
Important globals
Bootstrap employs a handful of important global styles and settings that you’ll need to be aware of when using it, all of which are almost exclusively geared towards the normalization of cross browser styles. Let’s dive in.
HTML5 doctype
Bootstrap requires the use of the HTML5 doctype. Without it, you’ll see some funky incomplete styling, but including it shouldn’t cause any considerable hiccups.
Responsive meta tag
Bootstrap is developed mobile first, a strategy in which we optimize code for mobile devices first and then scale up components as necessary using CSS media queries. To ensure proper rendering and touch zooming for all devices, add the responsive viewport meta tag to your .
You can see an example of this in action in the .
Box-sizing
For more straightforward sizing in CSS, we switch the global value from to . This ensures does not affect the final computed width of an element, but it can cause problems with some third party software like Google Maps and Google Custom Search Engine.
On the rare occasion you need to override it, use something like the following:
With the above snippet, nested elements—including generated content via and —will all inherit the specified for that .
Learn more about box model and sizing at CSS Tricks.
Reboot
For improved cross-browser rendering, we use Reboot to correct inconsistencies across browsers and devices while providing slightly more opinionated resets to common HTML elements.
What is Bootstrap?
- Bootstrap is a free front-end framework for faster and easier web development
- Bootstrap includes HTML and CSS based design templates for typography, forms, buttons, tables, navigation, modals, image carousels and many other, as well as optional JavaScript plugins
- Bootstrap also gives you the ability to easily create responsive designs
What is Responsive Web Design?
Responsive web design is about creating web sites which automatically adjust
themselves to look good on all devices, from small phones to large desktops.
Bootstrap 4 Example
<div class=»jumbotron text-center»> <h1>My First Bootstrap
Page</h1> <p>Resize this responsive page to see the effect!</p> </div><div class=»container»> <div class=»row»>
<div class=»col-sm-4″> <h3>Column 1</h3> <p>Lorem ipsum
dolor..</p> </div> <div class=»col-sm-4″> <h3>Column 2</h3> <p>Lorem ipsum
dolor..</p> </div> <div class=»col-sm-4″> <h3>Column 3</h3> <p>Lorem ipsum
dolor..</p> </div> </div></div>
Community
Stay up to date on the development of Bootstrap and reach out to the community with these helpful resources.
- Follow @getbootstrap on Twitter.
- Read and subscribe to The Official Bootstrap Blog.
- Join the official Slack room.
- Chat with fellow Bootstrappers in IRC. On the server, in the channel.
- Implementation help may be found at Stack Overflow (tagged ).
- Developers should use the keyword on packages which modify or add to the functionality of Bootstrap when distributing through npm or similar delivery mechanisms for maximum discoverability.
You can also follow @getbootstrap on Twitter for the latest gossip and awesome music videos.
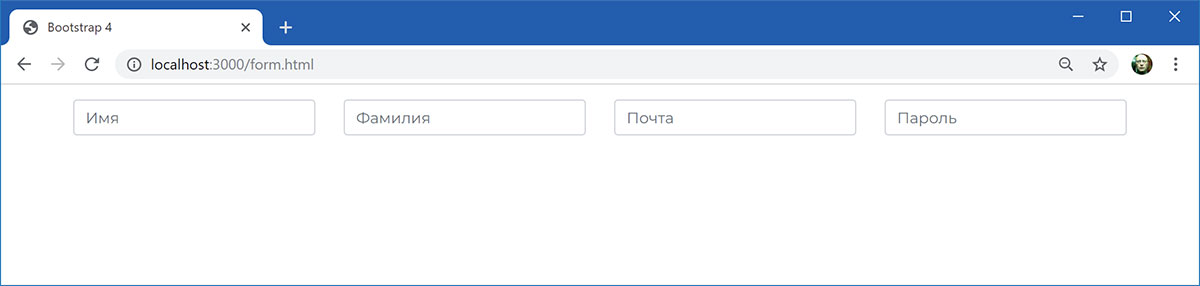
Использование сетки
<form>
    <div class="row">
        <div class="col">
            <input type="text" class="form-control" placeholder="Имя">
        </div>
        <div class="col">
            <input type="text" class="form-control" placeholder="Фамилия">
        </div>
        <div class="col">
            <input type="email" class="form-control" placeholder="Почта">
        </div>
        <div class="col">
            <input type="password" class="form-control" placeholder="Пароль">
        </div>
    </div>
</form>
<form>
    <div class="form-row">
        <div class="col">
            <input type="text" class="form-control" placeholder="Имя">
        </div>
        <div class="col">
            <input type="text" class="form-control" placeholder="Фамилия">
        </div>
        <div class="col">
            <input type="email" class="form-control" placeholder="Почта">
        </div>
        <div class="col">
            <input type="password" class="form-control" placeholder="Пароль">
        </div>
    </div>
</form>

<form>
    <div class="form-row">
        <div class="form-group col-md-6">
            <label for="input-email">Почта</label>
            <input type="email" class="form-control" id="input-email" placeholder="Введите email">
        </div>
        <div class="form-group col-md-6">
            <label for="input-password">Пароль</label>
            <input type="password" class="form-control" id="input-password" placeholder="Введите пароль">
        </div>
    </div>
    <div class="form-row">
        <div class="form-group col-md-3">
            <label for="input-zip">Индекс</label>
            <input type="text" class="form-control" id="input-zip" placeholder="Почтовый индекс">
        </div>
        <div class="form-group col-md-3">
            <label for="input-city">Город</label>
            <input type="text" class="form-control" id="input-city" placeholder="Город доставки">
        </div>
        <div class="form-group col-md-6">
            <label for="input-address">Адрес</label>
            <input type="text" class="form-control" id="input-address" placeholder="Адрес доставки">
        </div>
    </div>
    <button type="submit" class="btn btn-primary">Отправить</button>
</form>

Пример вертикального выравнивания элементов формы. Ширина каждого элемента определяется содержимым:
<form>
    <div class="row align-items-center">
        <div class="col-auto">
            <label for="input-email" class="sr-only">Почта</label>
            <input type="email" class="form-control mb-2" id="input-email" placeholder="Введите email">
        </div>
        <div class="col-auto">
            <label for="input-password" class="sr-only">Пароль</label>
            <input type="password" class="form-control mb-2" id="input-password" placeholder="Введите пароль">
        </div>
        <div class="form-check mb-2">
            <input class="form-check-input" type="checkbox" id="remember">
            <label class="form-check-label" for="remember">
                Запомнить
            </label>
        </div>
        <div class="col-auto">
            <button type="submit" class="btn btn-primary mb-2">Войти</button>
        </div>
        <div class="col-auto">
            Поля со звездочкой обязательны
        </div>
    </div>
</form>

Если не использовать класс , то эта форма выглядела бы так:

Важные глобальные переменные
Bootstrap использует несколько важных глобальных стилей и настроек, которые вы должны знать при его использовании, все они являются почти исключительно ориентированы на нормализацию кросс стилей браузера. Давайте начнем.
В HTML5 Тип документа
Bootstrap требует использования HTML5 doctype. Без него вы увидите местами неполные стили, но в том числе он не должен вызывать каких-либо значительных сбоев.
Адаптивный Мета-тег
Bootstrap в первую очередь разработан для мобильных устройств, стратегия, в которой мы сначала оптимизируем код для мобильных устройств, а затем масштабируем компоненты по мере необходимости с помощью запросов на основе CSS. Чтобы обеспечить правильную визуализацию и масштабирование касания для всех устройств, добавьте адаптивный мета тег viewport в свой .
Вы можете увидеть пример этого в действии в .
Размерность блоков
Для более простой калибровки в CSS, то переключатель глобальный значение для . Это гарантирует , не влияет на конечный вычисляется Ширина элемента, но это может вызвать проблемы с некоторыми программами сторонних разработчиков, таких как карты Google и Google пользовательского поиска.
В тех редких случаях, вы должны переопределить его, использовать что-то вроде следующего:
Приведенные выше фрагменты, вложенные элементы, в том числе контент, созданный с помощью и —Все наследуют указанную для .
Узнать больше о модель и размер в CSS трюки.
Normalize.css
Для улучшения кросс-браузер рендеринга, мы используем чтобы устранить небольшие расхождения в разных браузерах и на разных устройствах. Мы и в дальнейшем построить на этом с нашей, чуть более самоуверенные типы с Reboot.
Шаги для блокировки адаптивного просмотра
- Опустите просмотр как об этом сказано в
- Переопределить на Для каждого грид уровня, с одной ширины, например быть уверены, что это происходит после умолчанию Bootstrap CSS. Можно избежать с медиа запросы или какой-селектор-фу.
- Если вы используете навигационное меню, удалите все меню, которые могут сворачиваться/разворачиваться.
- Для макета разметки используйте классы как дополнение или вместо классов medium/large. Не волнуйтесь, для extra-small устройств разметка масштабируется для всех размеров экранов.
Вам еще нужно Respond.js для IE8 (так как наш медиа запросы еще есть и должны быть обработаны).
Это отключает «мобильный сайт» аспекта Bootstrap.