Введение
Содержание:
- Horizontal
- What is Bootstrap?
- Как обновить прошивку телевизора
- Customizing the grid
- Global settings
- Как получить и вернуть средства?
- III. Дополнительно
- Горизонтальная форма
- Адаптивные таблицы
- С чего начать изучение Bootstrap?
- Base nav
- Examples
- Reordering
- I. Начало работы
- Available styles
- Source files
- Community
- Button plugin
- Настройка грид
- Reordering
- Sass options
- Как это работает
- II. Классы и компоненты
- Responsive breakpoints
- Доступные команды Grunt
- Заводские Android браузеры
- Печать
- Create First Web Page With Bootstrap
- Выводы
Horizontal
Add to change the layout of list group items from vertical to horizontal across all breakpoints. Alternatively, choose a responsive variant to make a list group horizontal starting at that breakpoint’s . Currently horizontal list groups cannot be combined with flush list groups.
ProTip: Want equal-width list group items when horizontal? Add to each list group item.
- Cras justo odio
- Dapibus ac facilisis in
- Morbi leo risus
- Cras justo odio
- Dapibus ac facilisis in
- Morbi leo risus
- Cras justo odio
- Dapibus ac facilisis in
- Morbi leo risus
- Cras justo odio
- Dapibus ac facilisis in
- Morbi leo risus
- Cras justo odio
- Dapibus ac facilisis in
- Morbi leo risus
What is Bootstrap?
- Bootstrap is a free front-end framework for faster and easier web development
- Bootstrap includes HTML and CSS based design templates for typography, forms, buttons, tables, navigation, modals, image carousels and many other, as well as optional JavaScript plugins
- Bootstrap also gives you the ability to easily create responsive designs
What is Responsive Web Design?
Responsive web design is about creating web sites which automatically adjust
themselves to look good on all devices, from small phones to large desktops.
Bootstrap Example
<div class=»jumbotron text-center»> <h1>My First Bootstrap Page</h1> <p>Resize this responsive page to see the effect!</p> </div><div class=»container»> <div class=»row»>
<div class=»col-sm-4″> <h3>Column 1</h3> <p>Lorem ipsum
dolor..</p> </div> <div class=»col-sm-4″> <h3>Column 2</h3> <p>Lorem ipsum
dolor..</p> </div> <div class=»col-sm-4″> <h3>Column 3</h3> <p>Lorem ipsum
dolor..</p> </div> </div></div>
Как обновить прошивку телевизора
Чтобы приложения Смарт ТВ правильно функционировали, телевизор работал стабильно и с высокой скоростью, необходимо обновлять программное обеспечение устройства. Существует два способа для обновления прошивки: напрямую через сеть Интернет или с помощью USB накопителя. Рассмотрим, как установить последнюю версию прошивки на телевизор Lg с флешки. Для этого выполните такие действия:
- зайдите на сайт компании lg;
- вводите модель телевизора;
- выбирайте вкладку «поддержка»;
- переходите в «по»;
- из списка прошивок выбирайте новую версию;
- нажимайте на ссылку и скачивайте архив на компьютер;
- создайте папку с названием «lg_dtv» и поместите туда скаченный файл;
- подсоедините накопитель к телевизору;
- система предложит выполнить загрузку обновленной версии;
- нажмите «выполнить».
В данном обзоре подробно изучили, как через беспроводной интерфейс установить соединение с роутером. Пользователям даны ответы, почему телевизор не подключается к Интернету по wifi и предложены основные способы устранения проблем.
Customizing the grid
Using our built-in grid Sass variables and maps, it’s possible to completely customize the predefined grid classes. Change the number of tiers, the media query dimensions, and the container widths—then recompile.
Columns and gutters
The number of grid columns can be modified via Sass variables. is used to generate the widths (in percent) of each individual column while sets the width for the column gutters.
Grid tiers
Moving beyond the columns themselves, you may also customize the number of grid tiers. If you wanted just four grid tiers, you’d update the and to something like this:
When making any changes to the Sass variables or maps, you’ll need to save your changes and recompile. Doing so will output a brand new set of predefined grid classes for column widths, offsets, and ordering. Responsive visibility utilities will also be updated to use the custom breakpoints. Make sure to set grid values in (not , , or ).
Global settings
Bootstrap sets basic global display, typography, and link styles. When more control is needed, check out the textual utility classes.
- Use a that selects the best for each OS and device.
- For a more inclusive and accessible type scale, we assume the browser default root (typically 16px) so visitors can customize their browser defaults as needed.
- Use the , , and attributes as our typographic base applied to the .
- Set the global link color via and apply link underlines only on .
- Use to set a on the ( by default).
These styles can be found within , and the global variables are defined in . Make sure to set in .
Как получить и вернуть средства?
III. Дополнительно
глава шестая
Примеры
- Создание галереи изображений
- Динамическое создание модальных окон
- Форма обратной связи
- Как создать таймлайн (timeline)?
- Виджеты для выбора даты и времени
-
Галереи для представления статей или новостей на
сайте -
Как можно оформить комментарии на
сайте - Валидация HTML формы
-
Графическая капча для защиты
сайта от спама
глава седьмая
Разное
-
Как изменить
оформление Navbar (меню) -
Offcanvas (изменение мобильного вида меню
navbar) -
Сторонние компоненты для реализации
основного меню -
Создание своих адаптивных
контейнеров -
Инструкция по созданию
дополнительных стилей к компонентам - Оформление заголовков
- Набор шрифтовых иконок Font Awesome
- Шрифтовые иконки погоды
-
Сайты, c которых можно бесплатно загрузить
шаблоны и темы Bootstrap -
Справочник по CSS классам Bootstrap
3 -
Инструменты для визуального проектирования
макетов веб-страниц - Как оформить контент в виде выноски
-
Оформление элементов Bootstrap
в стиле Modern UI (Metro) - Создание сайта визитки (Часть 1)
- Создание сайта визитки (Часть 2)
- Создание сайта визитки (Часть 3)
- Создание сайта визитки (Часть 4)
- Создание сайта визитки (Часть 5)
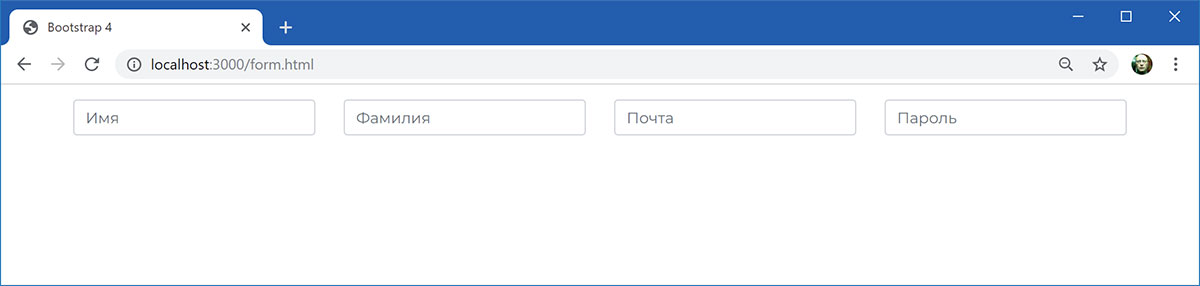
Горизонтальная форма
Вы можете использовать классы сетки Bootstrap для создания горизонтальных форм. Просто укажите, сколько колонок должен занимать каждый элемент. В частности, добавьте класс .row к .form-group и класс .col-*-* или .col-* для каждой колонки.
Вы также должны добавить класс .col-form-label к элементу <label>, чтобы метка относительно текстовых полей расположилась по центру вертикали.
<link rel=»stylesheet» href=»https://maxcdn.bootstrapcdn.com/bootstrap/4.0.0/css/bootstrap.min.css»>
<div class=»container»>
<form>
<div class=»form-group row»>
<label for=»first_name» class=»col-xs-3 col-form-label mr-2″>Имя</label>
<div class=»col-xs-9″>
<input type=»text» class=»form-control» id=»first_name» name=»first_name»>
</div>
</div>
<div class=»form-group row»>
<label for=»last_name» class=»col-xs-3 col-form-label mr-2″>Фамилия</label>
<div class=»col-xs-9″>
<input type=»text» class=»form-control» id=»last_name» name=»last_name»>
</div>
</div>
<div class=»form-group row»>
<div class=»offset-xs-3 col-xs-9″>
<button type=»submit» class=»btn btn-primary»>Отправить</button>
</div>
</div>
</form>
</div>
Bootstrap 4 против Bootstrap 3
Когда речь идёт о горизонтальных формах, имеются некоторые незначительные различия между Bootstrap 4 и Bootstrap 3.
Сетки
При использовании сеток для макета формы, Bootstrap 4 требует класс .row. Этот класс не является обязательным для форм Bootstrap 3 (хотя по прежнему обязателен для сеток Bootstrap 3).
Метки
Bootstrap 4 использует .col-form-label в сетке макета формы, тогда как Bootstrap 3 использует .control-label
Обратите внимание, что Bootstrap 4 изначально использовал .form-control-label, но впоследствии заменил его на .col-form-label.
Класс .form-horizontal
Bootstrap 3 требует класс .form-horizontal, тогда как Bootstrap 4 нет.
Адаптивные таблицы
Сделать таблицу адаптивной можно просто с помощью добавления класса к , благодаря этому у Вас появятся полосы прокрутки таблицы на устройствах с малыми дисплеями (менее 768px). При просмотре таблицы на устройстве с шириной экрана более чем 768px Вы даже не заметите разницы.
Вертикальной подрезки/усечения
Адаптивный таблицы использовать , который загибается любое содержание, которое выходит за пределы нижней или верхней кромками таблица. В частности, это может клип выпадающие меню и другие сторонние виджеты.
Firefox и fieldsets
Firefox имеет какой-то несуразный набор полей для укладки участием что мешает быть таблице адаптивной. Это не может быть изменено без Firefox на конкретные взломать, что мы не дают в Bootstrap:
Для получения дополнительной информации, прочитайте .
| # | Таблица Заголовок | Таблица Заголовок | Таблица Заголовок | Таблица Заголовок | Таблица Заголовок | Таблица Заголовок |
|---|---|---|---|---|---|---|
| 1 | Table cell | Table cell | Table cell | Table cell | Table cell | Table cell |
| 2 | Table cell | Table cell | Table cell | Table cell | Table cell | Table cell |
| 3 | Table cell | Table cell | Table cell | Table cell | Table cell | Table cell |
Обратный стиль
Превратите традиционную таблицу на их стороне с помощью . При использовании обратного стиля, заголовок таблицы будет в первом столбце, первая строка таблицы становится второй колонкой, вторая строка становится третьей колонкой, и т. д.
Содержание заказа и сложных таблицы
Помните, что изменения стиля визуальный порядок содержания. Убедитесь, что вы только применить этот стиль к хорошо сформированные и простые данные таблицы (и в частности, не использовать это для разметка таблицы) с соответствующими таблица заголовков ячеек для каждой строки и столбца.
Кроме того, этот класс не будет работать за таблицы клеток, которые охватывают несколько строк или столбцов (с помощью или атрибуты).
| # | Таблица Заголовок | Таблица Заголовок | Таблица Заголовок | Таблица Заголовок | Таблица Заголовок | Таблица Заголовок |
|---|---|---|---|---|---|---|
| 1 | Table cell | Table cell | Table cell | Table cell | Table cell | Table cell |
| 2 | Table cell | Table cell | Table cell | Table cell | Table cell | Table cell |
| 3 | Table cell | Table cell | Table cell | Table cell | Table cell | Table cell |
С чего начать изучение Bootstrap?
Первое, что нам необходимо — это скачать фреймворк и подключить его к странице. Как это выполнить детально описано в статье «Установка платформы Bootstrap».
После того как мы это сделаем обычно возникает следующий вопрос: «А что дальше? Как использовать Bootstrap?». На самом деле тут нет ничего сложного, создавать страницы с использованием Bootstrap очень просто.
Но для этого, нам необходимо сначала ещё изучить сетку и научиться её использовать для создания макетов страниц и разметки блоков. Почитать про неё можно тут (для тех, кто использует Bootstrap 3) или здесь (для Bootstrap 4).
Сетка в версии построена на , а в – на flexbox.
Затем нужно изучить компоненты и классы Bootstrap.
После изучение этих базовых вещей уже можно будет переходить к вёрстке сайта или веб-приложения.
Ну если ваша задача не просто использовать Bootstrap, а что-то в нём изменять, переделывать, то без хороших знаний CSS тут конечно уже не обойтись. Некоторые вещи, конечно, можно настроить через изменения SCSS переменных и применения миксинов, а другие – нет. И это касается любых фреймворков.
Navigation available in Bootstrap share general markup and styles, from the base class to the active and disabled states. Swap modifier classes to switch between each style.
The base component is built with flexbox and provide a strong foundation for building all types of navigation components. It includes some style overrides (for working with lists), some link padding for larger hit areas, and basic disabled styling.
The base component does not include any state. The following examples include the class, mainly to demonstrate that this particular class does not trigger any special styling.
Classes are used throughout, so your markup can be super flexible. Use s like above, or roll your own with say a element. Because the uses , the nav links behave the same as nav items would, but without the extra markup.
Examples
Alerts are available for any length of text, as well as an optional dismiss button. For proper styling, use one of the eight required contextual classes (e.g., ). For inline dismissal, use the .
A simple primary alert—check it out!
A simple secondary alert—check it out!
A simple success alert—check it out!
A simple danger alert—check it out!
A simple warning alert—check it out!
A simple info alert—check it out!
A simple light alert—check it out!
A simple dark alert—check it out!
Conveying meaning to assistive technologies
Using color to add meaning only provides a visual indication, which will not be conveyed to users of assistive technologies – such as screen readers. Ensure that information denoted by the color is either obvious from the content itself (e.g. the visible text), or is included through alternative means, such as additional text hidden with the class.
Link color
Use the utility class to quickly provide matching colored links within any alert.
A simple primary alert with . Give it a click if you like.
A simple secondary alert with . Give it a click if you like.
A simple success alert with . Give it a click if you like.
A simple danger alert with . Give it a click if you like.
A simple warning alert with . Give it a click if you like.
A simple info alert with . Give it a click if you like.
A simple light alert with . Give it a click if you like.
A simple dark alert with . Give it a click if you like.
Additional content
Alerts can also contain additional HTML elements like headings, paragraphs and dividers.
Well done!
Aww yeah, you successfully read this important alert message. This example text is going to run a bit longer so that you can see how spacing within an alert works with this kind of content.
Whenever you need to, be sure to use margin utilities to keep things nice and tidy.
Dismissing
Using the alert JavaScript plugin, it’s possible to dismiss any alert inline. Here’s how:
- Be sure you’ve loaded the alert plugin, or the compiled Bootstrap JavaScript.
- If you’re building our JavaScript from source, it . The compiled version includes this.
- Add a dismiss button and the class, which adds extra padding to the right of the alert and positions the button.
- On the dismiss button, add the attribute, which triggers the JavaScript functionality. Be sure to use the element with it for proper behavior across all devices.
- To animate alerts when dismissing them, be sure to add the and classes.
You can see this in action with a live demo:
Holy guacamole! You should check in on some of those fields below.
×
Reordering
Order classes
Use classes for controlling the visual order of your content. These classes are responsive, so you can set the by breakpoint (e.g., ). Includes support for through across all five grid tiers.
First, but unordered
Second, but last
Third, but first
There are also responsive and classes that change the of an element by applying and (), respectively. These classes can also be intermixed with the numbered classes as needed.
First, but last
Second, but unordered
Third, but first
Offsetting columns
You can offset grid columns in two ways: our responsive grid classes and our margin utilities. Grid classes are sized to match columns while margins are more useful for quick layouts where the width of the offset is variable.
Offset classes
Move columns to the right using classes. These classes increase the left margin of a column by columns. For example, moves over four columns.
.col-md-4
.col-md-4 .offset-md-4
.col-md-3 .offset-md-3
.col-md-3 .offset-md-3
.col-md-6 .offset-md-3
In addition to column clearing at responsive breakpoints, you may need to reset offsets. See this in action in the grid example.
.col-sm-5 .col-md-6
.col-sm-5 .offset-sm-2 .col-md-6 .offset-md-0
.col-sm-6 .col-md-5 .col-lg-6
.col-sm-6 .col-md-5 .offset-md-2 .col-lg-6 .offset-lg-0
Margin utilities
With the move to flexbox in v4, you can use margin utilities like to force sibling columns away from one another.
.col-md-4
.col-md-4 .ml-auto
.col-md-3 .ml-md-auto
.col-md-3 .ml-md-auto
.col-auto .mr-auto
.col-auto
I. Начало работы
глава первая
Подключение и настройка
-
Что такое Bootstrap и зачем он нужен?
-
Подключение к сайту
-
Сборка проекта с помощью Gulp (Bootstrap 4)
-
Пользовательская сборка платформы (Bootstrap 3)
-
Настройка платформы с помощью переменных LESS (Bootstrap 3)
-
Варианты установки, сборка с помощью Grunt (Bootstrap 3)
-
Инструмент Bootlint (Средство для проверки бутстраповских страниц на корректность)
глава вторая
Создание макета
- Адаптивный дизайн сайта. Что это и как его создать?
- Элементы сетки и как их использовать для создания макета
- Сетка (Bootstrap 3)
-
Изменение порядка следования адаптивных блоков в макете
(Bootstrap 3) - Сетка (Bootstrap 4)
- Основы создания адаптивно-фиксированного макета сайта
-
Создание адаптивно-резинового макета
- Media object (медиа-объект)
- Как создать фиксированный макет шириной 960px?
Available styles
Change the style of s component with modifiers and utilities. Mix and match as needed, or build your own.
Horizontal alignment
Change the horizontal alignment of your nav with . By default, navs are left-aligned, but you can easily change them to center or right aligned.
Centered with :
Right-aligned with :
Vertical
Stack your navigation by changing the flex item direction with the utility. Need to stack them on some viewports but not others? Use the responsive versions (e.g., ).
As always, vertical navigation is possible without s, too.
Tabs
Takes the basic nav from above and adds the class to generate a tabbed interface. Use them to create tabbable regions with our .
Fill and justify
Force your ’s contents to extend the full available width one of two modifier classes. To proportionately fill all available space with your s, use . Notice that all horizontal space is occupied, but not every nav item has the same width.
When using a -based navigation, be sure to include on the anchors.
For equal-width elements, use . All horizontal space will be occupied by nav links, but unlike the above, every nav item will be the same width.
Similar to the example using a -based navigation, be sure to include on the anchors.
Source files
Community
Stay up to date on the development of Bootstrap and reach out to the community with these helpful resources.
- Follow @getbootstrap on Twitter.
- Read and subscribe to The Official Bootstrap Blog.
- Join the official Slack room.
- Chat with fellow Bootstrappers in IRC. On the server, in the channel.
- Implementation help may be found at Stack Overflow (tagged ).
- Developers should use the keyword on packages which modify or add to the functionality of Bootstrap when distributing through npm or similar delivery mechanisms for maximum discoverability.
You can also follow @getbootstrap on Twitter for the latest gossip and awesome music videos.
Button plugin
Do more with buttons. Control button states or create groups of buttons for more components like toolbars.
Toggle states
Add to toggle a button’s state. If you’re pre-toggling a button, you must manually add the class and to the .
Single toggle
Bootstrap’s styles can be applied to other elements, such as s, to provide checkbox or radio style button toggling. Add to a containing those modified buttons to enable their toggling behavior via JavaScript and add to style the s within your buttons. Note that you can create single input-powered buttons or groups of them.
The checked state for these buttons is only updated via event on the button. If you use another method to update the input—e.g., with or by manually applying the input’s property—you’ll need to toggle on the manually.
Note that pre-checked buttons require you to manually add the class to the input’s .
Checked
Active
Radio
Radio
Methods
| Method | Description |
|---|---|
| Toggles push state. Gives the button the appearance that it has been activated. | |
| Destroys an element’s button. |
Настройка грид
Используя наш встроенного грид Sass переменные и карты, можно полностью настроить предопределенные грид классов. Изменение количества уровней, в медиа Размеры запроса и ширину контейнера—то перекомпилировать.
Столбцы и промежутки
Число грид столбцами и горизонтальными внутренний отступ (ака, промежутки) может быть изменен через Sass переменные. используется для создания ширины (в процентах) каждого отдельного столбца в то время как делятся поровну между и для водостоков колонки.
Грид уровней
Перемещение за пределы самих колонок, Вы также можете настроить количество грид уровнях. Если вы хотели всего лишь три грид уровней, вы бы обновление и Что-то вроде этого:
При внесении любых изменений в файл Sass переменные или карты, Вам необходимо сохранить изменения и перекомпилировать. Это будет совершенно новый набор предопределенных грид классы для ширины столбцов, смещение, толкает и тянет. Адаптивный ЖКХ видимости также будут обновлены, чтобы использовать пользовательские точки останова.
Reordering
Order classes
Use classes for controlling the visual order of your content. These classes are responsive, so you can set the by breakpoint (e.g., ). Includes support for through across all five grid tiers.
First, but unordered
Second, but last
Third, but first
There are also responsive and classes that change the of an element by applying and (), respectively. These classes can also be intermixed with the numbered classes as needed.
First, but last
Second, but unordered
Third, but first
Offsetting columns
You can offset grid columns in two ways: our responsive grid classes and our margin utilities. Grid classes are sized to match columns while margins are more useful for quick layouts where the width of the offset is variable.
Offset classes
Move columns to the right using classes. These classes increase the left margin of a column by columns. For example, moves over four columns.
.col-md-4
.col-md-4 .offset-md-4
.col-md-3 .offset-md-3
.col-md-3 .offset-md-3
.col-md-6 .offset-md-3
In addition to column clearing at responsive breakpoints, you may need to reset offsets. See this in action in the grid example.
.col-sm-5 .col-md-6
.col-sm-5 .offset-sm-2 .col-md-6 .offset-md-0
.col-sm-6 .col-md-5 .col-lg-6
.col-sm-6 .col-md-5 .offset-md-2 .col-lg-6 .offset-lg-0
Margin utilities
With the move to flexbox in v4, you can use margin utilities like to force sibling columns away from one another.
.col-md-4
.col-md-4 .ml-auto
.col-md-3 .ml-md-auto
.col-md-3 .ml-md-auto
.col-auto .mr-auto
.col-auto
Sass options
Customize Bootstrap 4 with our built-in custom variables file and easily toggle global CSS preferences with new Sass variables. Override a variable’s value and recompile with as needed.
You can find and customize these variables for key global options in our file.
| Variable | Values | Description |
|---|---|---|
| (default), or any value > 0 | Specifies the default spacer value to programmatically generate our spacer utilities. | |
| (default) or | Enables predefined styles on various components. | |
| or (default) | Enables predefined styles on various components. | |
| or (default) | Enables predefined gradients via styles on various components. | |
| (default) or | Enables predefined s on various components. | |
| or (default) | Deprecated | |
| (default) or | Enables the generation of CSS classes for the grid system (e.g., , , , etc.). | |
| (default) or | Enables pseudo element caret on . | |
| (default) or | Enables styles for optimizing printing. |
Как это работает
На высоком уровне, блочная система работает так:
- Существует три основных компонента—контейнера, строки и столбцы.
- Контейнеры— для фиксированной ширины или на полную ширину—центрирует содержание вашего сайта и помогает выровнять содержание блока.
- «Rows» — горизонтальные группы столбцов, которые обеспечивают чтобы столбцы выстроились правильно.
- Контент должен быть помещен в столбцах, и только колонки могут быть непосредственными потомками строк.
- Классы столбце указано количество столбцов, которые вы хотите использовать из 12 возможных в ряду. Так что если вы хотите три равные ширины столбцов, нужно использовать .
- Столбец устанавливаются в процентах, так они всегда изменчивый и размерами по отношению к родительскому элементу.
- Столбцы имеют горизонтальную для создания промежутка между отдельными столбцами.
- Есть пять грид уровней, по одному для каждой : сверхмалые, малые, средние, большие, и очень большие.
- Грид уровни основываются на минимальной ширине, то есть они применяются к ярусу и всем, кто выше его (например, применим для малых, средних, больших, и очень больших устройств).
- Вы можете использовать предопределенные грид классов или Sass примеси для более семантической разметки.
Звучит хорошо? Отлично, давайте перейдем посмотрев все это на примерах.
II. Классы и компоненты
глава третья
Оформление контента
- Оформление и работа с текстом
- Стилизация HTML списков
- Средства Bootstrap для оформления изображений
-
Оформление HTML таблиц
- CSS для HTML элемента figure
-
Классы платформы для HTML форм
-
Примеры оформления форм
-
Вспомогательные классы
- Оформление заголовков
глава четвёртая
Компоненты
-
Breadcrumb (навигационные
цепочки, хлебные крошки) -
Collapse и создание на базе него
аккордеона -
Dropdowns (выпадающие
списки) -
Jumbotron
(оформление ключевой информации) -
Modal (модальные окна для
веб-страницы) -
Navs (навигационные
блоки) -
Navbar (основное меню
сайта) -
Panels (Bootstrap 3
панели) - Popovers (всплывающие панели)
-
Scrollspy (выделение ссылок на
основании положения прокрутки) - Tabs (Bootstrap 3 вкладки)
-
Thumbnails (Bootstrap 3
галерея) - Alerts (сообщения)
- Badges (бейджи)
- Buttons (кнопки)
- Carousel (карусель)
- Pagination (навигационный блок для пагинации)
- Progress (индикаторы выполнения)
- Tooltips (всплывающие подсказки)
только для Bootstrap 3
- Иконки Glyphicons
-
Affix (sticky-позиционирование
элементов)
только для Bootstrap 4
- Card (карточка)
- Spinners (Спиннеры)
- Navbar (основное меню)
глава пятая
Классы помощники
-
Управление отображением элементов (Bootstrap 4)
-
Классы для работы с flexbox (Bootstrap 4)
-
Управление margin и padding отступами (Bootstrap 4)
-
Управление границами и скруглениями углов элементов (Bootstrap 4)
Responsive breakpoints
Since Bootstrap is developed to be mobile first, we use a handful of media queries to create sensible breakpoints for our layouts and interfaces. These breakpoints are mostly based on minimum viewport widths and allow us to scale up elements as the viewport changes.
Bootstrap primarily uses the following media query ranges—or breakpoints—in our source Sass files for our layout, grid system, and components.
Since we write our source CSS in Sass, all our media queries are available via Sass mixins:
We occasionally use media queries that go in the other direction (the given screen size or smaller):
Note that since browsers do not currently support , we work around the limitations of and viewports with fractional widths (which can occur under certain conditions on high-dpi devices, for instance) by using values with higher precision for these comparisons.
Once again, these media queries are also available via Sass mixins:
There are also media queries and mixins for targeting a single segment of screen sizes using the minimum and maximum breakpoint widths.
These media queries are also available via Sass mixins:
Similarly, media queries may span multiple breakpoint widths:
The Sass mixin for targeting the same screen size range would be:
Доступные команды Grunt
(Просто собрать CSS и JavaScript)
Регенерирует каталог с скомпилированными и уменьшенными CSS и файлами JavaScript. Обычно для пользователя Bootstrap , это команда необходима.
(сборка и проверка документов активов)
Сборка и тестирование CSS, JavaScript, и прочих активов, которые используются при локальном использовании документации через .
(Построить абсолютно все и запустить тесты)
Компиляции and минифайлы CSS and JavaScript, строит сайт документаций, запускает HTML5 валидатор против документов, восстанавливает активы настройщика, и многое другое. Требует Jekyll. Обычно это необходимо, только если вы взломали сам загрузчик Bootstrap.
Заводские Android браузеры
Из коробки, Android 4.1 (и даже некоторые новые версии) ставят приложение Браузера в качестве веб-браузера по умолчанию(в отличие от Chrome). К сожалению, стандартные браузеры имеют множество ошибок и несоответствий с CSS в целом.
Меню выбора
На элементе, в Android браузере не будет отображаться элементы управления если есть и/или . (Смотри этот вопросы на StackOverflow более детально.) Используйте фрагмент кода ниже, чтобы удалить этот CSS и сделать элемент без стиля на Android браузере. Избегать недовольство юзера помогает использование браузеров: Chrome, Safari и Mozilla.
Хотите увидеть пример? Проверьте это JS Bin demo.
Печать
Даже в некоторых современных браузерах, для обеспечения печати приходится изловчиться.
В частности, в Chrome версии 32 независимо от параметров отступов и размеров полей, Chrome при печати использует значительно более узкую область просмотра, чем физический размер бумаги при отображении медиа запросов. Это может привести к тому, при печати Bootstrap неожиданно активирует очень мелкую сетку. и Ошибке Chrome #273306. Рекомендуемые обходные пути:
- Примените extra-small разметку и убедитесь, что ваша страница выглядит приемлемо.
- Настройка значения Less переменных, чтобы ваш бумага для принтера рассматривалась больше, чем extra-small.
- Добавить Пользовательское медиа запросы изменение грид Размер точки останова для печати медиа только.
Также, как Сафари и v8.0, фиксированной ширины может вызвать Сафари использовать необычайно маленький размер шрифта при печати. См. #14868 и В WebKit ошибка #138192 Для более подробной информации. Одним из возможных обойти это, добавив следующие CSS:
Create First Web Page With Bootstrap
1. Add the HTML5 doctype
Bootstrap uses HTML elements and CSS properties that require
the HTML5 doctype.
Always include the HTML5 doctype at the beginning of
the page, along with the lang attribute and the correct character set:
<!DOCTYPE html><html lang=»en»> <head> <meta charset=»utf-8″> </head></html>
2. Bootstrap 3 is mobile-first
Bootstrap 3 is designed to be responsive to mobile devices. Mobile-first styles are
part of the core framework.
To ensure proper rendering and touch zooming, add the following tag inside the
element:
<meta name=»viewport» content=»width=device-width, initial-scale=1″>
The part sets the width of the page to follow the screen-width
of the device (which will vary depending on the device).
The part sets the initial zoom level when the page is first loaded
by the browser.
3. Containers
Bootstrap also requires a containing element to wrap site contents.
There are two container classes to choose from:
- The class provides a responsive fixed width container
- The class provides a full width container, spanning the entire width of the viewport
.container
.container-fluid
Выводы
Главное, что нужно принимать во внимание при обращении в МФО Быстроденьги – беспроцентный первый займ до 3 дней, получение кредита наличными в офисе, средняя по рыночным меркам процентная ставка, большая вероятность одобрения. Рейтинговым агентством RAEX МФО «Быстроденьги» присвоен рейтинг ruBBB+ со стабильным прогнозом. В целом МФО «Быстроденьги» производит о себе самое благоприятное впечатление, а ее репутация надежного финансового учреждения говорит сама за себя
Также благоприятно сказывается наличие большого количества представительств для выдачи денег наличными или для открытия быстрокарты для онлайн займа
В целом МФО «Быстроденьги» производит о себе самое благоприятное впечатление, а ее репутация надежного финансового учреждения говорит сама за себя. Также благоприятно сказывается наличие большого количества представительств для выдачи денег наличными или для открытия быстрокарты для онлайн займа
Рейтинговым агентством RAEX МФО «Быстроденьги» присвоен рейтинг ruBBB+ со стабильным прогнозом. В целом МФО «Быстроденьги» производит о себе самое благоприятное впечатление, а ее репутация надежного финансового учреждения говорит сама за себя. Также благоприятно сказывается наличие большого количества представительств для выдачи денег наличными или для открытия быстрокарты для онлайн займа.